How to make a mushroom cap
The closer the New Year, the more pressing the issues of tailoring various fancy dresses. In some kindergartens and schools, this may be timed for the autumn holidays, as a result of which young mothers are in a hurry looking for opportunities to dress their child as it should be. For example, in a mushroom costume, the main thing is a hat, which can be done in several ways.
Soft hat mushroom in the garden: simple tailoring


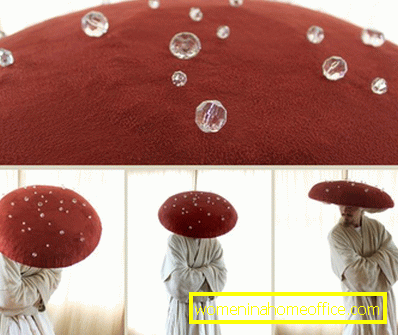
The big round cap of the mushroom must retain a given shape, so it will take a lot of materials: the main fabric will be red fleece, and on the wrong side you can take a more unpretentious fabric - crepe-satin, cotton, chintz. But be sure to monophonic, white.
A large sheet of foam rubber or penofol, a thin foam material used to protect fragile objects, will act as a frame for the cap. Each of these fabrics, as well as the material for the base, will need at least 60-70 cm in length, provided that the width is the same. But the final dimensions you need to measure out for your child. The finished hat will have wide margins, but it should look so that it does not seem to be removed from an adult. And to fix the cap on the head, you will need a wide (1.5-2 cm) ribbon, 1 m long. A sheet (50 x 50 cm) of white dense felt will go to the finish.
The pattern for the mushroom cap is an incomplete circle, the radius of which will be 35 cm. To draw it as correctly as possible, you can use a measuring tape fixed in the center of the paper for a pattern with a simple needle. First, a full circle is drawn, after which, in its original form, it is transferred only to the fabric that is intended for the wrong side: cotton or crepe-satin.
On the fleece and foam rubber you need to cut the incomplete circle - with the sector seized at 30 degrees. The sector can be larger and reach up to 90 degrees - how much more inclined the finished cap will be depends on it: the more we remove from the circle, the sharper will be the top of the cone. When cutting parts do not forget about the need to save about 1-1.5 cm on the seams.
The next point is the combination of the main parts. First, you will need to fold the cotton lining and the fleece red top together. Due to the fact that the latter has an outer edge shorter in length, cotton will be slightly harvested. Secondly, the foam and fleece are superimposed on each other and immediately grab the thread, so that in the future they are not deformed. The additions marked on the fleece are layered, the part is tightened into a full-fledged cone, and stitched along the superimposed edges. The same happens with foam rubber, which is already fixed under the fleece, but without gains.
After this, it will be left to gather the gathered cotton circle to the billet of fleece and foam rubber, and turn the cap out, winding in all the seams. If you know that it will be difficult to turn out such a structure, you can work right away on the finishing side, but you can carry out the seam in a secret way, without using a sewing machine, manually.
Now it is necessary to remove the extra empty space in the cap: for this purpose, the center of the cotton underside for 1-2 stitches is pulled to the top of the fleece cone. Then it remains only to cut the long ribbon in half, grab its edges over the fire or process the overlock, and hem it to get the side ties. And at the final stage the cap of a mushroom is decorated with white circles, the diameter of which is chosen arbitrarily, depending on the overall size of the hat. It is desirable to cut them from dense felt so that they are not subjected to deformation.
To make the soft fabric cap of the mushroom look as plausible as possible, you should add the bottom layer in the form of a wavy airy fabric to it: this will be the same translucent "skirt" of the mushroom that looks out from under its cap. It is cut out in the form of a classic circle, without removing the sectors, and sewn to the finished product. Remember that its edges should be visible, so the diameter of the circle will be 1-2 cm larger than the diameter of the upper surface of the cap.
Amanita hat: made of cardboard or paper
The cap of a mushroom is made of paper using almost the same algorithm as a cloth. However, there is a main nuance here - fastening of the cap to the head: in contrast to the fabric, the paper is smoother and does not fix on its own. Therefore, a certain skeleton is needed for it: a small fabric cap or a rim, which will also be covered with a cloth, can come up to it as much as possible to merge with the cap.
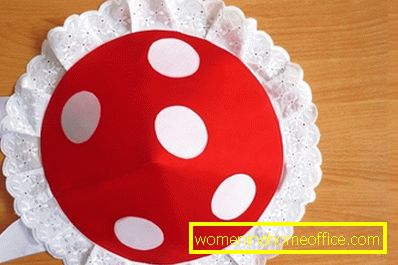
On the pattern of the paper cap of the mushroom there is no need to increase the seams: it is enough to cut a circle with a radius of 40 cm from a large sheet of drawing paper, and then also remove the sector from it. In the case of paper, it is recommended to make a removal of no more than 35-45 degrees, so that the cap could be flat and easily glued together with its edges: working with a more sloping cone will be problematic.
If you manage to find the red cardboard of the desired size, there will be no problems with the design, but if the paperman is simple, you will need to additionally give it the desired color. This is recommended to do with the help of red velvet paper. It achieves the most natural effect, in contrast to the simple design of the drawing paper with acrylic paints or gouache. Small white circles are glued on top, which are also cut out of velvet paper or thick cardboard.
In order for the paper cap of the mushroom to hold well on the child’s head, you will need a bezel and 2 cotton cuts, measuring 40 by 40 cm. From the 1st cut, you need to cut a circle with a radius of 20 cm, then glue it to the cap in the center. It is advisable to stretch the fabric a little, so that it does not fall completely on the cardboard, but retains the air cushion under the very top of the cone. This will not allow the cap to fall too low on the head. The remaining fabric cut will be wrapped around the bezel.
You can use another option of fixing the cap on the head, cutting off 2 tapes 40-50 cm long. They should be hemmed from the inside of the cap on the sides, making classic ties. In addition, you can fix the cap of an Amanita if you make a small inner hat from a jersey with a wide edge - it can be sewn from an ordinary wide elastic band.
And if the density of the received cardboard cap is not enough for you, you can add another 1 sheet of drawing paper under it, also cut out in the form of a circle with a withdrawn sector. Or use for this purpose penofol.
Amanita costume: photo


To make a mushroom cap with your own hands is quite simple, and every young mother will cope with this task for the evening. For complete reliability, it is recommended to pick up white fluffy pantaloons and a free blouse of the same color. A ready-made hat can be decorated with a large butterfly, "perching" on it, or a caterpillar, which has looked out of a mushroom.