How easy and beautiful step by step pencil to draw a castle
Everything that the child sees or reads, he immediately wants to display on paper. And if your toddler has already become interested in books about knights and is happy to watch cartoons about princes and princesses, then you probably will have to ask how to draw the castle in stages with a pencil. For beginners we offer several useful recommendations.
How to become a royal heir?

Pencil possession is not only an important skill that determines the level of development of a child’s personality, but also an excellent way to show one’s creativity. What a kid does not dream to live in this royal house! To walk around in different rooms all day, get confused in the corridors and stumble upon secret doors ... Please your kid and invite him to draw a real castle. But how to do it easily and beautifully, we will tell further. You will need a pencil, ruler, eraser and ... fantasy.
Gothic castle
In the illustrations to fairy tales most often depicted castles in the Gothic style. These buildings are notable for their great grandeur and beauty. It is quite easy to determine the structure belonging to such a well-known architectural medieval direction. You need to close the palm of the palace to the line of the towers - the upper part will look like a separate, independent lock.

Instruction:
- Draw a rectangle.

- On the left and on the right, we draw another narrow one to it, making the upper part slightly protruding above the main figure.
- Using the base of the upper ledge, draw an isosceles triangle with slightly prominent lower corners.

- We add teeth to the top line of the main rectangle - the wall.
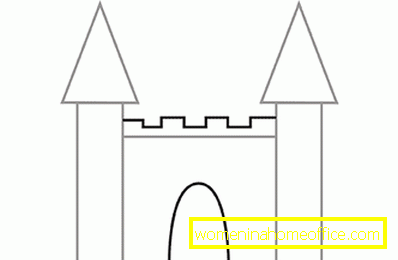
- We finish the third tower behind the battlements. Draw two parallel lines, add an isosceles triangle on top.

- We make the entrance arch.
- Get to the details. Add reliefs under the triangles of the roofs.
- Denote the lattice at the gate of the arch.
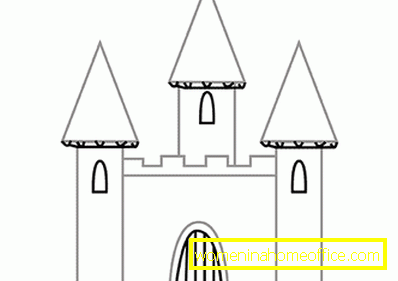
- On each turret we draw windows - ovals with a straight lower frame.
- On the roofs of the towers we show the imitation of the masonry.
- We draw fragments of bricks on the walls.
- Slightly shade windows.
- On the steeples of the towers drew a fluttering narrow flags with a sharp end.

- Direct the line. The castle is ready.
Home for princess
Any girl dreams of becoming a princess. And not only because you can wear magnificent dresses and wait for the appearance of a beautiful prince who will spell her with a kiss. But also because the daughters of the royal couple live in a luxurious castle. And let it be impossible to settle in it, but to draw it is quite realistic.

Instruction:
- We start with two perpendiculars for the base. On the vertical line we denote by horizontal lines 3 levels of height of the towers.

- We restrict the side parts of the future castle with two lines, not forgetting the designation of the corners for elevations under the towers' roofs.
- Then proceed to the drawing of the lower tier - two squares in the middle, side rectangles on the sides with protruding parts above the level of the central wall.
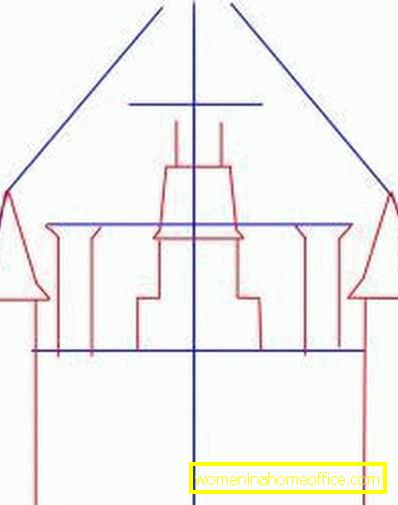
- On the side elements, we draw isosceles triangles of the towers, in which the corners of the base are slightly rounded.
- We start the second tier. In the center we draw the symmetrical parts of the stepped column.
- We finish the two side columns between the borders of the first and second levels.

- To the left and right of the central column we draw two spiers.
- So we got to the third level. We start with the design of the top of the column in the center. To do this, draw a trapezoid with a base slightly less than the top side of the figure.
- We draw the triangular roofs of the side towers.

- On the sides of the central column we draw two columns with flat roofs.
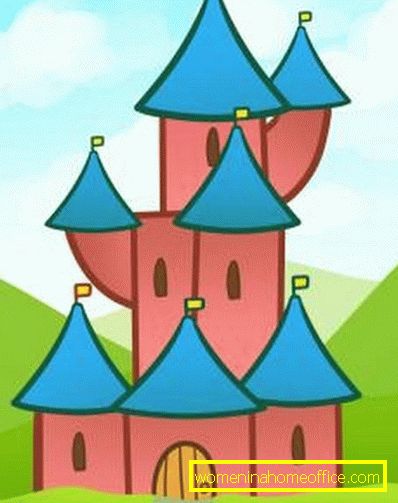
- Detailing the picture. We denote the windows on the towers, flags and masonry connecting the walls with triangles of roofs.

- Add a gate.
This guide, explaining how to draw a castle of a princess, can be greatly simplified by depicting the house of the daughter of the lord of the sea depths.
Ariel Castle
Instruction:
- We draw the triangle of the roof of the upper tier of the towers.
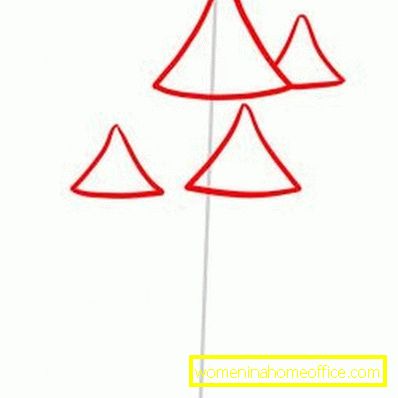
- On the right we draw a fragment of the triangle of the second roof.
- At the level of the last third of the base of the central figure draw a triangle of the second tier.
- At the same level on the left, we sketch another tower.
- Then we draw three triangles for the lower level of the towers.

- Now the lines show the walls emanating from the base of the roofs.

- We finish the windows, flags on the roofs.
- On the wall of the central tower draw a rounded door. The house for Ariel is ready.

Snow Queen Fortress
Andersen's tale is popular not with one generation of children. Therefore, it will be useful for many to know how to draw the Snow Queen's castle with a pencil in stages so that it fits the description of the great Dane to the maximum. Here is one of the options.

Instruction:
- Through the sheet we draw the axial line horizontally.
- The lower part is divided into three fragments. In the central part we have a castle, and on the sides - snow-capped mountains.
- Draw a horizontally located rectangle.
- Retreating a third from the top edge, draw another rectangular shape - the tower.
- In the remaining space we make another turret.
- We finish two more towers on the sides, bringing their spiers-triangles of roofs to the border with the base.
- The second level is filled with columns, and the third (last) - with thin long spiers.
- On the roofs we draw flags, we denote windows and gates. The castle is ready.
Instructions for beginners, describing how to draw a castle in stages, will help to master the skills of images of buildings with many projections. For those who hold a pencil more confidently and cope with drawings without difficulty, the master class will be interesting with original designs of fabulous royal possessions. In any case, the process of drawing will involve the adult and the child in co-creation with the authors of fairy tales and will allow to show the richness of imagination.