Decoupage on the tree
Wood products are certainly beautiful in their naturalness, but unlike artificial materials, wood is subject to external changes that do not always happen for the better. As a result, for small things there is a question about a kind of "cosmetic repairs." For this ideal decoupage, the basics of which can be mastered independently.
Decoupage on a tree for beginners: basic knowledge
In a general sense, decoupage is the design of wooden surfaces with paper or cloth patterns. The surface area does not matter: to decorate using this technology, you can either have a small jewelry box or a wardrobe. Before fixing the selected picture, the wood is treated, and then it is necessarily overlaid with varnish. If necessary, decoupage is perfectly combined with other design techniques: it can be combined with craquelure, 3D-design, contour stroke, as well as simple painting with acrylic paints, adding any volume elements from ribbons to artificial stones. Depending on the chosen style, surface decoration techniques will be selected.
Decoupage drawings are most often purchased at the store: these are special decoupage cards, which are fairly thick paper, which do not spread out when wet, but become softer and easily take on the desired shape. After its fixation by means of glue on a tree, the decoupage card practically merges with the surface and does not look like a foreign element at all. The same can be said about the drawings on a thin fabric, although they are used much less frequently. It is also allowed to design using simple napkins, pressed into 3-4 layers, on which the desired pattern or pattern is applied. They are a bit softer than decoupage cards and require more careful handling, but they are suitable for the execution of the conceived not worse.
If you are going to create a thing from scratch, but have decided that it will be immediately framed with the help of decoupage technology, professionals advise to purchase already prepared parts in the store. If you have to work with an old wooden surface, or you intend to decorate a new, fresh wood, be sure to perform its primary processing, which will affect the adhesion of the pattern and the surface to which it is applied.
To improve grip, the wood is carefully trimmed with sandpaper (“zero” sandpaper), after which chips and cracks, if any, are filled with putty material, and sandpaper again passes through the surface. Then it is necessary to prime the wood, for which either an artistic primer or white acrylic paint is used, which is applied with a porous sponge, trampling the product into wood. The choice of shade is due to the fact that it is white that will maximally manifest all the colors that lie on it, including the colors in which the drawing of the decoupage card is made. Any other shade can peek through it and, therefore, give unwanted color distortion.
In the case when the surface has been coated with varnish, paint or other material, it is pre-removed, which may require a grinding machine, or, for its absence, a drill, which can be operated both with a special nozzle and with a drill laid flat . This is followed by a standard procedure for brushing shavings and dust, sanding and priming. Without these steps, it is no use to decorate wood using the decoupage technology, since all the beauty you create will not last an hour.
How to make decoupage on the tree: step by step instructions

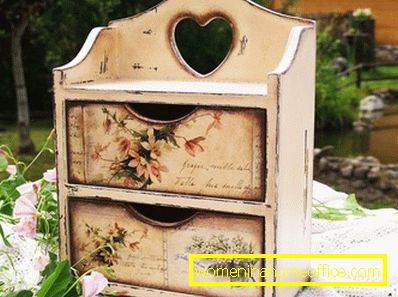
Beginners are recommended to try professionals with simple things: a box, cabinet doors, a tray, a cutting board, etc. The surface with which you will be working should be flat and, preferably, have sufficient area so that there are no problems with either the preliminary processing or the subsequent placement of a decoupage card. If the product is complex, I will separate it into parts.
In addition to the blank itself, which can be a full-fledged product, you will need a selected drawing, wide brushes with artificial bristles, glue, a transparent file for papers, a soft sponge, acrylic paint and varnish. If necessary, decorative trifles are added to the general set for decoupage: paints and glitters, 3D lacquer, volumetric details.
According to the technology discussed above, the wooden surface is cleaned of the old coating, degreased, smoothed, leveled. Then a drawing is prepared. If you purchased a decoupage card, then it should be placed in a container with warm water and held there for 2-3 minutes. for thick paper and 1 min. - for fine. If the work is done with a napkin, then the top layer is carefully separated from it, on which the drawing is applied directly. After that, the wood is treated with glue, and the applique is laid on it, but it should not be pressed. There is a transparent file for the papers on top, and the drawing starts to be smoothed so that air bubbles are gone and possible folds and creases are eliminated. It is necessary to move the brush to the edges. Only after the drawing is smoothed, it is gently pressed to the woody surface.
The last step is the finishing treatment of the product: when the glue fixing the pattern dries (usually it takes 1-1.5 hours), the surface is varnished. If necessary, after drying, it is additionally made out with paints, varnish is applied on it again. It can take up to 5-6 hours to completely dry the product decorated using the decoupage technology, depending on the thickness of the lacquer layer. If you have worked with a complex product, in the completion of its details are collected together.
We work in vintage style

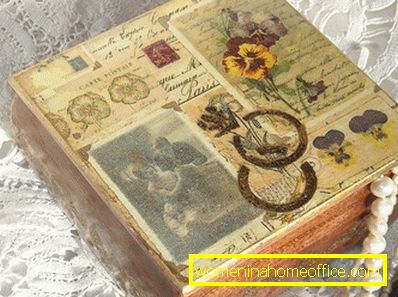
Vintage involves the intentional giving of age to things that are maintained in this style. It is ideally combined with the decoupage technique, since the paper drawings themselves on the same caskets or cabinet doors remind of the 18th - 19th centuries, when wooden surfaces were skillfully painted by artists, and then, in the 20th century. stickers had already begun to appear, with which the wood was decorated. To arrange the surface in vintage style, it is important not only to choose the appropriate pattern, but also to give it the correct relief.
Craftsmen are engaged in this at the stage of wood preparation, immediately after it has been smoked and primed. To make the surface look as if bark beetles have passed through it, or it has cracked and cracked from time to time, use a brush that can be mounted on a drill or a regular brush with a metal bristle. Additionally, wood is necessarily treated with a stain, which will give it an uneven dark shade. And if this is not enough for you to feel the breath of antiquity, you can resort to the craquelure. This is the effect of a cracked surface, achieved with the help of a special varnish, as well as several shades of paint (lighter on the lower layer and darker on the upper layer).
But the main role in the embodiment of vintage style through decoupage is, of course, given to drawings. Here you need to pay attention to the images of newspaper records in a thin, ornate hand, large flowers - peonies, roses, pansies. If you can’t find dekupazhnye cards with similar patterns, you can even use old newspapers: perhaps because of the fragility of the paper with them will have to work with more caution.
Speaking about the choice of drawings for decoupage in vintage style, one can not but mention the French edition, directly associated with black and white cinema. Therefore, the images here are all made in a monochrome gamut, while the patterns can be both elaborate and complex, which characterizes the palace style, and more immediate, associated with nature - this is the very Provence that conquered and conquers girls and women around the world. The main thing here - to withstand the design in soft, light colors, cool shades. And the wood itself is recommended to paint in white or cream color.
The obligatory moment in decoupage made in vintage style is the wear of the surface: this nuance comes to life at the last stage, before the product is coated with varnish. It is enough just to scrape the edges of the casket, door, etc. with a knife to remove the top layer of paint, and the object of decoration will acquire the missing "zest". Or you can always use paper that mimics the unevenness of the surface.

Decoupage wood at home is much easier to implement than other techniques for decorating products. The main thing is not to forget to carefully degrease and level the surface, which will already become the guarantor of the quality of the work done. And special cards can always be replaced with simple napkins with a pattern you like, which allows you to save a lot on materials.