Wicker weaving for beginners
At all times, products woven from wicker were popular. Such products are very diverse in style, design, and purpose. The main feature of items woven from the vine is their high strength.
How to start weaving from the vine?
For beginners to weave from the vine you need to learn one thing - when weaving you need to know 3 types of designs from a rod: bow, beamless and two-beam. The most simple and durable type of construction is beamless. Therefore, for a person who has never engaged in weaving from a vine, this is the most optimal weaving option.

Before weaving from the vine we select the raw materials. The annual and biennial shoots of wild-growing willow of different length serve well as raw materials. Before cutting willow twigs, we first check for flexibility. We reel the rod on the finger: if it does not break, then it is suitable for work and you can safely cut it. Before weaving, all the bars are sorted by appearance, thickness and length. We dry the rods so that they do not lose their appearance.
What to weave from the vine for beginners?
The simplest product from a rod is the basket, you should start learning from it.
- Such baskets begin to weave from the bottom.It is very convenient, quick and much easier than starting a basket with an onion and having a base on it.
- Take six rods of the required length plus 5 cm for the allowances. Three rods thicker expand in the middle to form a gap. Insert the pegs into the resulting gap so that it is easier to thread those three rods. Then we place them in the middle of the bar so that they do not break the gap. Get an unstable cross.
- This cross must be handled with care, otherwise it is possible to destroy the entire structure until we braid it with thin rods.
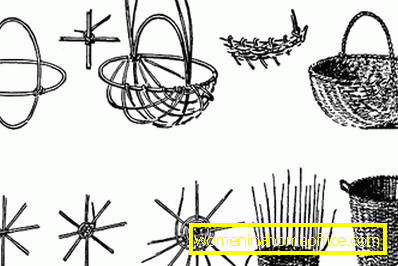
- We begin to weave a basket. Bars for weaving we take the thinnest. The first rod is the thinnest and longest, we throw it on any three and weaving, then we embrace the second three, the third and the first one again. We go around three or four times with this rod. Then the bottom cross will hold well. The remaining ends of the rod can not be left so, otherwise the whole structure will unravel. We skip the end of the rod for the braided row and tighten it so that the design is well fixed. When we weave four pairs of rods, it will be noticeable that the step from one triple to another is big. We will not do such big steps further. Separate triad separately. The middle ones are left in place, and the extreme ones are delayed to the sides. Instead of four bases, you get twelve. Those rods that have been bent to the sides, tend to return to their original position. Work with them carefully so that the bars do not break.
- We continue to weave the bottom of the basket from the vine in this way, and you will see that the bottom begins to increase. Now do the second fork. We begin to do it already with new rods. We stick rods with oblique cuts. The base will double. We also weave until we get the size of the desired bottom. Around the whole circle we run a row of thicker rods that can fix the very bottom. The bottom is ready, and it needs to be allowed to dry. Now we prepare the rays prepared for earlier, near the bottom of each beam. We stick in two bases on each side. The rays of the basics are collected in a bundle so that the tips do not interfere when weaving the basket. First we weave the rope in three rods. She will firmly fix the basics. We continue to weave and the rest of the ranks. Such baskets do not do deep. Now we twist the rope into three rods. If you think that the basket is not very deep, then still weave two or three ropes in three rods, you need to stick the rods not in a row, but one third from the circumference.
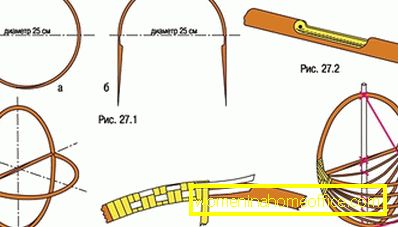

- It remains to make a border.The rods for borders use very wet. We take a thick awl. We install it on the edge of the side of the basket at any base. We bend the base through the awl to the outside and draw around two right-standing bases at once, put it inwards, draw another one there and draw it outside. Awl is necessary in order to set the desired height of the bend. Repeat the same with other basics. We pair the fourth base with the first end, which sticks out and a pair of two outlines, one out and both ends out. It turned out the first pair for weaving a braid. We make all the other pairs for weaving braids. You should have three pairs with six bases. Of them need to weave braids.
- We begin to weave a braid from the resulting pairs gently, bending the bars. We weave, until we reach the first pair, from which the braid began to weave and where wedges now stick out. Remove them and insert into the hole ends. Cut the ends.
- A pen.The handle of such a basket is not eternal, sometimes instead of the handle a rope is fitted. But this is better not to do, because other material can destroy the basket itself.

This method weave a basket of wicker. If you make every effort and patience, you can create beautiful household items at home. You should always start with the simplest to get some skills. In addition to baskets, you can weave vases, tables, chairs, armchairs and much more. But all the time you need experience, desire and patience! Good luck!
Especially for womeninahomeoffice.com.ru - Alenka