How to sew or knit an envelope for a newborn
The envelope for the newborn is an integral part of the baby’s wardrobe. It is useful not only when the mother with the baby will be taken from the hospital. Subsequently, you can walk on the street, putting the baby in the envelope, and later, when the child grows up, use it as a blanket. You can sew or tie such an envelope with your own hands.
How to sew an envelope for a newborn with your own hands?

Any young mother wants the envelope to be discharged from the maternity hospital to be beautiful, festive and elegant.
- For work you will need: satin fabric, fleece fabric, soft fabric for lining (batiste, calico), lace trim and ribbon.
- The product will be sewn in square shape. First we take an atlas and cut 2 squares out of it. One of them will be 1m × 1m in size, and the second - 40 cm × 40 cm. Then we cut a square of 1m × 1m in size from fleece. We take that square from the atlas, which is smaller in size, we fold it in the shape of a triangle and iron it well. Then apply the product to a right angle to any corner of the square, cut from fleece. We sew the base of the triangles, we mark the sides.
- Next, combine the details of satin and fleece, sweep, and then stitch on a typewriter. Do not forget to leave a small place not attached. This is necessary in order to be able to turn out the product.
- After we take the fabric from which we will make lace sheets. Its size, after bending and treating the seams, should be 1 m × 1 m. Carefully wash the fabric, iron out, process the seams. We take the cooked lace, and sew it on the corner of the sheet with a zigzag stitch. When sewing it is better to trim the lace a little, then it will look much better.
- Everything, your envelope for an extract of the newborn from maternity hospital is ready! When using, insert the sheet inside so that the laces remain outside.
The scheme of a warm embroidered envelope for a newborn with their own hands
It is convenient when the birth of a baby falls on a warm season and you can sew a light summer envelope. But after all, a happy event can happen in winter, which means that a warm envelope will be needed.


- For work, you will need: a material with a size of 185 cm × 150 cm, a synthetic winterizer according to the size of the fabric (you can take a synthetic winterizer for several layers), 50 cm of elastic, 2 lightnings - detachable (about 55 cm) and regular (about 25 cm) and 1 m oblique Bakey.
- Cut out from the base material details according to the following scheme, not forgetting to leave the material allowances for the seams.
- Then, we cut out the pockets according to the pattern suggested below.
- Further on the same patterns we cut out details from a synthetic winterizer. For a blanket, you can cut any number of layers of padding polyester: the more of them, the warmer the envelope will be. The minimum number of layers is 2-3.
- Also from a synthetic winterizer we cut out details for a pocket. It will be enough 1-2 layers.
- On the top of the blanket, mark the place where the pocket will be sewn. This can be done with the help of chalk, soap or sew large stitches.
- Then we begin to sweep the lightning. It is sewn so that it is located to the face of the upper fabric, and the lock is located down.
- In the same way it is necessary to tackle the second lightning. Proceed according to the proposed scheme:
- Then we sew a synthetic winterizer on the lower fabric with large stitches. Alternately each layer. Further to the pattern of the pocket, we also tackle the synthetic winterizer. Then turn the pocket inside out, stitch on the side where the gum will be worn (this place is indicated on the pattern in red). After that, we turn it over again, iron it along the seam, fold it widowed and stitch it 2 cm from the edge of the seam. Insert the gum into the resulting connector, fix it on one side, tighten it to a length of 45 cm and fix the second side of the gum.
- Open sections of the pocket should be processed oblique bake. At the end of work with a pocket, it should be sewn on the place indicated on the pattern.
- The finished parts of the envelope are folded face to face, stitched, leaving 15-20 cm under the pocket not stitched. Next, turn the envelope through the hole left, sew the left incision with a secret seam, gently smooth everything with a warm iron.
- After that, the blanket should be manually quilted so that the synthetic winterizer does not get lost. After you have completed this work, remove all visible basting from the product.
How to use such an envelope?
Place the envelope on a flat surface with the pocket down. Unfasten the split zipper in half, grab the pocket from the bottom and turn it to the front. Then, put the baby in the envelope, fasten both zippers to the end. You will have a cap over the head of the child. Here is a warm envelope for the newborn!
Knitted envelope for newborns with their own hands


If you like knitting more, you can also tie an envelope for discharge from the maternity hospital!
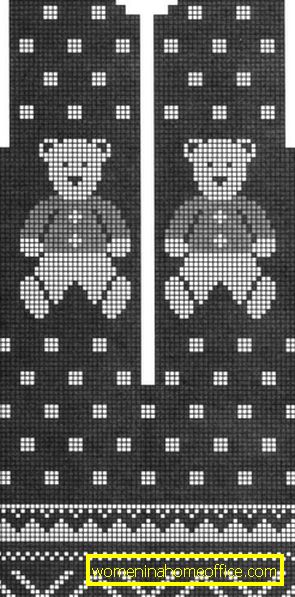
- For this you need needles number 4 and number 5, and 550 g of yarn. If you knit a three-color envelope offered in the picture, you will need three-colored yarn. 350 g of primary color yarn, 150 g of white yarn and 50 g of blue yarn. In addition, circular needles No. 4 and 5 buttons will be needed.
- To start, type 63 loops, and start to knit according to the proposed scheme.
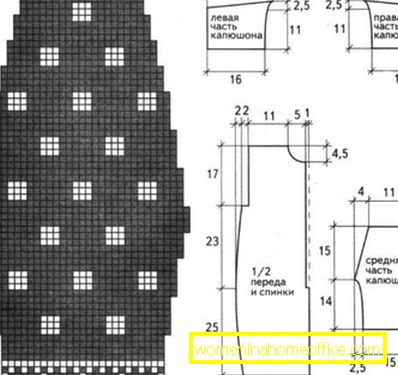
- When the front is ready, we begin to knit back. It fits in by analogy with the forehand, but the missed loops are knitted in the middle, and the neck is not made.
- The next stage - knitting sleeves. To do this, dial 39 loops, and knit a 1.5 cm blue rubber band. And to continue knitting should be according to the scheme.
- The next stage is knitting a hood. First you need to link the middle part of it. To do this, dial 25 loops, and knit according to the scheme:
- Then type 27 loops, and tie the left side of the hood according to the scheme.
- Then, take 27 loops, and knit the right side of the hood, which knits similarly to the left, but symmetrically to it.
- And the final stage - the assembly of the finished product.
- First, sew the front and back of the envelope along the shoulder seams, side seams and sleeve seams. Insert the sleeves into the product. Collect the hood according to the proposed scheme, and sew it into the neck of the envelope. Across the hem of the buckle and the hood, dial 197 loops, and knit 2 cm with an elastic band. In the right strap at the same distance, tie the loops. To do this, close the two loops, and again dial them in the next row. Next, close all the loops, sew to the product buttons. To decorate the corners of the hood, we make two white tassels, and sew them.
Knitted envelope for newborns!
Sewing or knitting an envelope for a newborn is not difficult for a woman who loves and knows how to do needlework. This thing will warm the baby thing, made by your hands! It will be a great addition to the baby's dowry.