Clothes hanger with your own hands. methods of making
Even in a modern apartment, the interior of which is made in high-tech or baroque style, there is always a place for a hand-made part. Such a trifle can be a decorative vase, a lamp or a hanger. The latter is always relevant for women, and is especially necessary in small rooms, where saving space is the main requirement for the chosen furniture. In this case, it is better to make a floor coat hanger, rather than put a bulky closet.
How to make a coat hanger with your own hands?


There are several types of this element: it can be simple hangers that can be put into the closet, whose creation takes not so much time. The main variations at the shoulders 2: under the pants and skirts, i.e. with clothespins, and under the shoulder products - dresses, blouses, jackets, etc. type of hanger - floor, which is analogous to the closet for rooms with a small area. Of course, this is not a complete replacement: not many things can fit on such a hanger, but it can make life much easier, especially with regard to finding the right piece of clothing. Recycled variation of the floor hanger - ceiling, more spacious, but also more complex in execution. In a rented apartment or in a hostel this is not put, because for its attachment is required to disrupt the ceiling pattern.
For this pendant, any stick or tube of cylindrical shape, whose diameter is in the range of 32-38 mm, will be the basis. If it is a tree, it must be sanded using sandpaper of varying degrees of abrasiveness. To varnish a product, on the contrary, is undesirable.
Additionally required metal brackets in the amount of 4 pieces., Drill, screwdriver and screws. In addition, you should find a strong rope, whose length is equal to the required distance from the base of the hanger from the ceiling multiplied by 4. That is, if it is necessary to fix the cylindrical element at a distance of 45 cm from the ceiling, 1.8 m of rope is taken, to which it is desirable to add another 8-10 cm to fix the knot.
In the ceiling at a distance equal to the length of the base of the hanger, from which 8-10 cm was taken away, a hole is made with a drill for screws and 2 metal brackets are attached. The rope, cut into 2 equal parts, is passed through the bracket so that the ends of it equidistantly hang down. They are tied into knots, and a cylindrical stick or pipe is threaded into the resulting hinges. It is desirable to fix the rope on it with staples along the edges.
To make the product look harmonious and in no way betray its origin, it is recommended to devote a few minutes to the issue of decorating it. For example, wind the base with the same rope as the one that was used to fasten the hanger. At the end of the work, it can be painted, or done before the assembly process begins. In addition, you can take for the foundation of the product not only a flat pipe, but also a large branch of a tree, treated with varnish or paint, if such a creative move fits into the interior.

How to make hangers for clothes?

The same coat hanger can be made for a child, but in this case it is recommended to fasten it not to the ceiling, but to the wall, since otherwise the kid will not reach it. Therefore, for fixing the base, you will need metal short tubes in the amount of 2 pieces. Their length will be 30-35 cm, but it is most convenient to navigate the length of the child’s arm from the elbow to the tips of the fingers.
They are attached to the wall by means of metal corners, bolted. The base should lie on the tubes so that 7-10 cm on each side is left behind them. From the floor it is recommended that the coat hanger be positioned so that it touches the chest of the child that is suitable for it.
In the interior of the nursery you can enter more interesting options. Every kid will love to hang clothes on the branches of a tree, but not real, but created on the wall. Surround or flat - you decide. The latest version is a little easier because it requires only a lot of wooden slats, several single hooks, paint and small screws. Instead of strips, thin plywood is well suited, on which from the seamy side a contour of the future product is drawn with a pencil, after which it is cut. On the front side, paint is added to streaks and shadows on the trunk, as well as other small details.
Of course, in a similar way you can make not only a tree: animals, fish, flowers, characters of your favorite cartoons. To achieve maximum similarity, it is recommended to prepare a large-sized pattern, which will later be transferred to plywood. It only remains to fix it on the wall, randomly place the hooks on it, painting them to match the product, and a bright hanger for the nursery is ready.
Floor hanger - comfortable and beautiful!

In the hallway, the hangers often cited earlier are not enough: not many things will be placed on them. But sometimes you need and make up shoes there too. This will help floor hanger of metal pipes with a small (22-25 mm) diameter. In addition, they will need a drill, screws, and furniture wheels will not interfere if there is a need to move the coat hanger to another part of the apartment.
The process of creating such a product is as simple as possible: long pipes (1.3-1.7 m) will become a vertical base, they need 2-3 pieces. Shorter - 0.7-0.9 m are used as horizontal bars at the bottom: they need 4-5 pieces, with 1 of them fastening the vertical axles at the bottom, the rest will be screwed close to it, creating the bottom of the hanger. The crossbar of the same length should be fixed horizontally at the top, strengthening the verticals. Bottom to it perpendicularly in the same plane are screwed tubes with a length of 0.3-0.4 m., And also fastened at the ends. The hooks of the hangers will cling to this crossbar, and the lower base will allow you to hold the structure vertically due to its area. If necessary, it is placed on the furniture wheels located in the corners along the perimeter.
How to make clothes hangers?

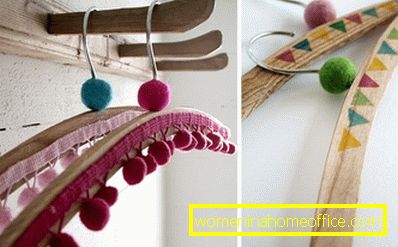
If you managed to make the main hanger, you should attend to the hangers and to it. They have no less varieties, and almost all are subject to independent production. However, novice masters better try their hand at simpler versions. For example, in the creation of fabric hangers.
Its basis will be a simple plastic hanger or a metal / wire hook, which is easy to make yourself, twisting a thick wire in 2 additions and giving the desired shape. Also any thick stick with a length of 42-48 cm is useful: it can even be a sushi stick. In addition, the necessary fabric of 2 types: dense for the draft layer and more subtle and decorative for obtyagivaniya. Usually, felt and atlas are purchased, and it is worthwhile to take a synthetic winterizer to them. The last little things - threads, needle, ribbons and beads to decorate the product.
It is possible to connect a stick and a hook either by an additional piece of wire, or by adhesive tape, and the better and stronger the fixation, the better. How thick the winding turns out to be is not important: it will be blocked by a large amount of cloth. The resulting construction is applied to the seamy side of a dense material, it contours the contour, and then 2 identical parts are cut out.
It is desirable in the area of the hangers (not hooks!) To add 1.5-2 cm each, so that the resulting empty space inside, when the parts are sewn together, and the rod is inserted into them, filled with padding polyester. Here the seams can be quite obvious: this type is a draft. The following details, on a thin and beautiful fabric, are cut with a minimum allowance for the seams, therefore, they will be swept and sewn as accurately as possible.
See also:Beautiful shelves do it yourself
If desired, a similar coat hanger can be decorated with a ribbon at the base of the hook or beads strung on a thread. If it was created for a child, you should initially pick up a bright, not monophonic material. In the same way, you can simply wrap up the old wooden hangers, adding inside the volume to them at the expense of the filler.