Tack do it yourself
Each woman who is engaged in cooking in the kitchen, uses to remove the hot oven. Someone buys them, someone likes to do it yourself.
Any housewife really wants to have beautiful and cozy things in the house, creating a good mood for the whole day and facilitating the whole process of household chores in the kitchen. Mitts just belong to the things that are able to give the kitchen its own charm and zest. Those that can be purchased in stores are not always distinguished by originality and quality, therefore Tacks can be made with your own hands, putting in them creative imagination, love and effort.
DIY pot holders
- To sew tacks with your own hands, prepare a square of thermal batting measuring 46 cm by 46 cm, 2 small squares from fabric 45 by 45 cm, a strip for the edging 35 cm long and 5 cm wide, pieces of flannels, batting and 21 by 21 towels, pins and thread.

- Prepare the finished blank as follows: fabric, wadding, fabric of a different color and inside the wrong side. Leave a free space of 0.5 cm. Scarlet fabric with pins so that the pieces do not move out.
- Sew the pieces together at the same distance 5 cm from each other. Attach the front side along the entire length of the edge of the edge of the fabric with a width of 1.3 cm to the wrong side. Pin the edge fabric with the edges together.
- Attach to the tacking edge fabric, folding it with the edge of an angle of 450C. Sew a fabric to the first side at a distance of 6 mm from the edge. From the other side, stop at a distance of 6 mm and back a couple of stitches.
- On the tack fold the edge fabric too at an angle of 450C. To do this, lift a strip of fabric upward, and then lower the bottom along the adjacent side. As soon as you get a triangular fold, proceed to the embedding.
- Repeat the same with other parties. At the end of the work again fold the edge fabric at an angle of 45.0With and remove the end. Use scissors to cut the extra batting, but be careful not to cut the folds at the corners.
- Cut a piece of fabric along an oblique, its width should be 12.5 cm. Fold the edges of the fabric towards the center inside with the wrong side. Fold in half again. Press fabric and sew around the edges. Pin the resulting loop to the corner of the tack. Attach a hem to the contrasting fabric and tack it to the tack stitches in the form of zigzags.
Crochet tacks


- You will need a hook number 2, cotton fabric and yarn of any color. The simplest scheme for knitting tacks is to create the muzzles of various animals. Having learned to knit a basis, it is easy enough to come up with various variations of such tacks.
- Choose the yarn of the desired color to create an animal, for example, brown for the head of the dog or gray for the bunny. Start the knit circle first. Dial a chain consisting of 5 air loops and lock it into a ring. Tie 10 rings into this ring, making the first row without a single crochet.
- Thread a different color mark the beginning of a new series. This will allow not to get confused after further knitting. In each row without crochet add 6 columns. You should have 2 rows of 16 columns, 3 rows of 22 columns, 4 of 28 and further in the same order. Crochet the desired number of rows until the tack reaches the desired size.
- Associate the muzzles and eyes of the animal in the form of small circles in exactly the same pattern, then sew it to the head. It is best to make eyes of black yarn, and the muzzle of the same color as the head. On the muzzle you can sew a black nose in the form of a connected circle.
- To make the ears, knit them not in the shape of a circle, but in the form of a semicircle. Type in air loops in the amount of 3 pieces and knit the first row into a ring in the form of 6 non-crocheted posts. Continue to continue to knit also in the form of a circle, but turn knitting when half the circle ends. In each row you do not add 6 loops, but 3. As soon as you tie up 2 details of the lugs, sew them with a secret stitch to the head.
- When knitting the ends and knots of thread, thread to the wrong side. Cut out the reverse side of the future oven mitt from the fabric that matches the color. It is best to choose a cotton fabric, this fabric does not stretch, unlike knitwear or calico. When cutting, do not forget to leave along the edge of a hem of 0.7 cm. Fold the edge and sew it with a secret stitch to the knitted part. You can also stitch out and stitch on a typewriter. The fabric part of the back of the tack will not allow the knitted part to curl or stretch.
How to sew a tack in the form of a butterfly?
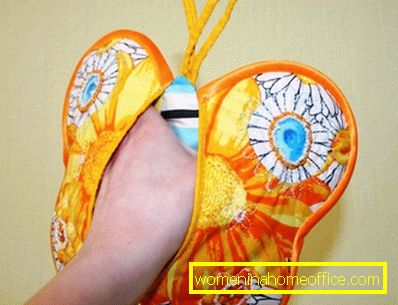
To do a butterfly tack, Prepare natural fabrics of your favorite colors, 1 m of braid, glue synthetic winterizer pins, threads, scissors, needle. Dig out 2 large parts of the fabric, 4 small details for the wings. When cutting, add 1 cm to the seams. Then, open 1 large part and 2 small parts for the wings from the sintepon. Connect the synthetic winterizer on the reverse side with the lower and upper parts. Seal the edges with pins and sew. Trim excess parts.
Fold the 2 small parts inward with the front side, overlaying the padding polyester and stitching it on the inside. Unfold the wings so that the seam is turned inside. Sew the side seams of the wings. Cut the excess parts and attach the fragments of the picture to the working part. On a large detail, put 2 small, combining the wings. Stitch them along the edge of the wings with a zigzag. Rip off the edges of the tacking tape so that the seams are not visible. Make the antennae of the butterfly in the form of eyelets to immediately hang the tack on the carnation, decorating the kitchen.
Any housewife in the kitchen has many useful items needed in the household. If you look closely at the tack, they are not only useful, but also very beautiful, create a mood and are an element of decor. If you want to work in the kitchen was a joy, do tacks with your own hands.