Souvenirs with your own hands. master class
19-05-2018
Home and hobby
As you know, the best gift is a gift made by yourself. Small souvenirs always bring a lot of joy. To be engaged in their production, it is not necessary to possess special talent or abilities. DIY souvenirs can be made from any available materials.
DIY souvenirs: master class
A coffee tree

You will need:
- Coffee beans;
- Whitewash brush;
- Glass;
- Neprolivayka;
- Transparent super glue and PVA;
- Brown thread;
- Small flower pot;
- Sand or small pebbles;
- Pencil;
- Satin ribbon;
- Coffee grounds;
- Gypsum;
- Foam ball, with a diameter of 7 cm;
Instruction:
- Wrap the ball with brown thread. This is necessary so that the coffee beans stick better. Attach the ends of the thread with glue. Leave a free circle on the ball with a diameter of 1 cm.
- Cover the ball with coffee beans using PVA. It is better to apply glue on a small area, then fix the grain. When you paste over the whole ball, set it aside - let it dry. After, you can proceed to gluing the 2nd layer. It is recommended to glue the grains of this layer in those places where there are gaps from the first.
- When the billet is ready, leave the coffee ball to dry. Then insert a pencil in the previously marked place. It will be a tree trunk. Remaining gaps around the barrel, cover with coffee beans.
- Dissolve the gypsum, add some coffee grounds to it. Pour the finished plaster into the cooked flower pot, insert a tree into it. Leave the tree overnight to allow the gypsum to dry. In the morning, cover the pot with sand or small pebbles, and wrap the trunk with satin ribbon.
Fridge magnets

You will need:
- Polymer clay;
- Stamps;
- Magnetic base;
- Acrylic paints;
- Glue gun;
- Sandpaper.
Instruction:
- Roll the polymer clay in a thin layer as you usually roll out the dough for ravioli. Using stamps, make prints on the rolled bed. To get a color drawing, first dip the stamps in the paint of the desired color. If you do not have stamps, you can draw your favorite drawing on clay using a knife.
- Using a tumbler or jar, cut the resulting magnets. Let them dry. After using a glue gun to glue the magnetic base, and the roughness and unevenness of the magnet polish with emery paper. After finishing work, cover the magnet with a transparent varnish.
- Easily make magnets of any size, color and shape. If desired, you can make a figurine of polymer clay, paint it and attach a magnetic base.
DIY souvenirs from scrap materials
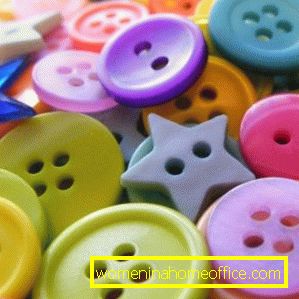
Button Caterpillar

You will need:
- Buttons of different colors and sizes;
- Cotton ball with a diameter of 4 cm;
- Wire, 1 mm thick;
- Multicolored felt;
- Black felt pen;
- Paint yellow and red;
- Needle;
- Tassels;
- Scissors;
- Pliers;
- PVA glue.
Instruction:
- Using pliers, cut the wire 20 cm long. Bend one end into a loop, twist it. A head will be attached to this end.
- Cut 15 pieces of felt in different colors, 4 cm in diameter, into the felt. In the middle of each circle, make holes using a regular needle. String circles of felt on a wire in a multicolored sequence, alternating them with buttons.
- When you reach the desired track length, slide the wire through the 2nd hole of the last button and twist it. To make the legs, cut from the wire 5 pieces about 10 cm long. Put small buttons on the wire, leaving 3 cm at the end of each leg. Pass the ends of the wire through the 2nd hole in the buttons and glue.
- Bend the resulting legs in half and tightly wrap them on the body, distributing an equal distance from each other.
- Paint a cotton ball in yellow - it will be a caterpillar head. When the paint is completely dry, make 2 holes in the ball and glue small pieces of wire into them, put the small button on the ends, then twist the wire. This will be the antennae.
- Glue 2 small buttons of black color to your head - eyes and one red nose. Red paint draw mouth and cheeks. A ready-made caterpillar can be presented as a souvenir for a holiday.
Coffee Bean Mug

You will need:
- Any mug;
- Cotton pads;
- Coffee beans;
- Lace and ribbon;
- Threads;
- Acrylic brown;
- Brush;
- Glue.
Instruction:
- Cover the mug with cotton pads, not forgetting the pen. Tie a cotton cup tightly with thread.
- Paint it brown, let it dry. After glue over the entire surface of the mug of coffee beans in 2 layers. Decorate the ready coffee mug with ribbon and lace.
DIY souvenirs for March 8
Fan of forks
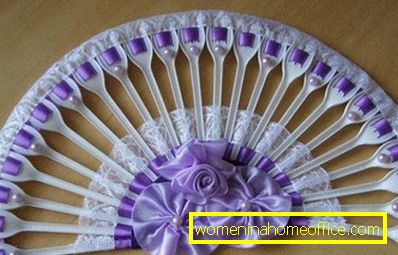
You will need:
- Disposable forks - 22 pcs.
- Super glue;
- Lace ribbon;
- Satin ribbon;
- Artificial flowers;
- Double sided tape;
- Pencil;
- Compass;
- Cardboard;
- Scissors;
- Ribbon of flowers;
- Beads.
Instruction:
- Draw a circle on the cardboard using a compass. Cut it and divide it into 2 equal parts. Cut again. Glue the arms of the forks to one of the parts, keeping the same indent and one length. The distance between the plugs should not be large. From the top of the handles, glue the 2nd part of the cardboard.
- Insert the ribbon between teeth like you want. It is best to thread the tape so that when going from plug to plug, the first and last teeth are captured. When threading the tape, do not forget to grease it with a small amount of glue.
- On the head of the forks, glue a ribbon of flowers. Thread through the forks on the cardboard and secure the lace ribbon. Decorate the top of the cardboard oval with artificial flowers using double-sided tape and beads. At the base of the fan, attach a satin ribbon tied with a bow. At the very end, you can decorate the sharp part of the forks with beads.
- Fan is ready! It will be a wonderful gift for March 8 for any girl and woman.
DIY souvenirs: photo


See also:DIY candles
DIY souvenirs are a great opportunity to show your attention to the person to whom they are meant. You make absolutely unique products, taking as a basis the necessary materials and embodying a variety of ideas. Look for inspiration on the Internet, in souvenir shops.