Pattern dress with cap sleeves
Of course, every woman wants her outfit to look perfect and unique, so many wear clothes that they sew themselves. It is believed that the dress pattern with cap sleeves is the simplest, because this style does not have strict lines. Any clothes with such sleeves look feminine and elegant. How to make such a pattern with your own hands? Let's look at a few models.


Pattern straight dress with cap sleeves: master class
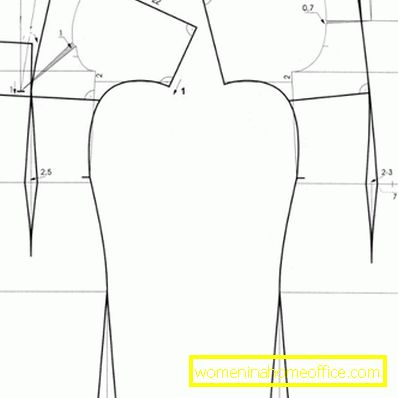
The main secret of the one-piece sleeves is that it must be cut out simultaneously with the back, as well as the shelf of the entire dress.

Necessary materials:
- scissors;
- paper or old wallpaper for the pattern;
- pencil;
- centimeter for taking measurements;
- crayon or piece of dry soap.
Building a dress pattern with cap sleeves:
- We start with the basics. To determine the desired length, you need to postpone from the waist to the bottom about 70 cm.
- By reducing the tucks, you can lengthen the armhole in front of a centimeter. The back rest is then deepened by 2 cm.
- Through the obtained points it is necessary to draw perpendicular lines to the base sections along the sides. This is needed to make the sleeve pattern.

- Near the armholes should slightly raise the cutting line of the shoulder - 5 mm from the front and 7 mm from the back.
- From the edge of the shoulder you need to postpone at least 7 cm to the neck - the only way to properly build its line.
- From the side of the back you need to increase the neck, and then you should draw a new main line of the back.
- Closer to the center of the back it is necessary to draw a model line, as well as lines where the shoulders will be cut. All this is done at an angle of 90 degrees.
- At the place where the shoulder blades, dart is applied to the neck. Where the waistline is, a dart is also drawn, and then they are connected by a line.
- Increases shoulder cutting line by 20 cm.
- Bottom line draws from below, while maintaining an angle of 90 degrees.
- Before the armhole, you need to draw a line on the bottom of the resulting sleeve, then to be able to slightly extend it. Smooth curve is drawn lower cut, descending to the waist.
- The part of the curve that connects the slice lines, placed on the side in front, with the slices of the sleeves from the bottom to the same part of the back, is transferred.
- The front tuck is shifted near the waist relative to those located on the main pattern. It is necessary to extend the dart to the shoulder at the waist and bring it to the very convex place of the chest.
- At an angle of 90 degrees to the center of the front of the need to draw an insert, the width of which is 10 cm and is located a centimeter below the highest part of the chest. Then you need to draw a line, which will be carried out undercut, near the cut on the side.
- The placement of the undercut is transferred to the back, and then it must be drawn to the very tuck at the waist level.
- All the elements that are in front and on the back, you need to narrow down on the sides of the bottom by 3 cm.
- Then new lines are indicated - the wedge of the skirt itself near the cut on the side.
So it turns out the dress pattern case, and it remains only to cut the drawn elements, and then transfer them to the fabric and sew.
Pattern dress with a bat sleeve
When creating this pattern, you need the same materials that are used in the previous model.
The order of construction patterns:
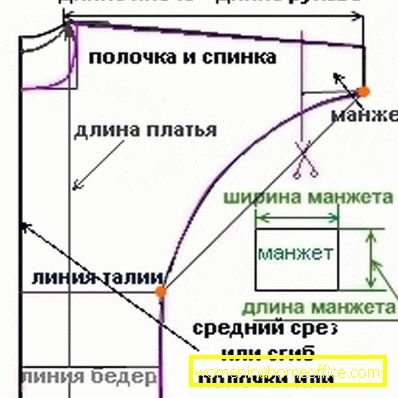
- To get a dress pattern with a bat sleeve, you must first draw the upper part of the dress, and then increase it to the desired length of the product. Creating a pattern, it is necessary to note the entire length of the product.
- Then you should check the width of the hips. The width of the part itself should be a quarter of the circumference of the thighs, to which 1 cm is added, in order for the product to lie flat.
- Mark the sleeve length. To do this, you must begin to take the measure from the neck, ending with the lower part of the sleeve. Then put down the desired size on the pattern itself according to the measurements taken.
- It remains to be noted from the very bottom line of the cuffs, the length of which is about 15 cm. Then you need to draw another straight line parallel to the bottom line and you can begin to cut the finished pattern.
The principle of drawing patterns of different models of dresses with one-piece sleeves is similar, but the differences, of course, still exist. If you want to sew a summer dress, you can use the following pattern, substituting your size.
For the dress pattern, having a single-cut sleeve, you do not need to have special skills. Even beginner needlewomen will cope with it. Skilled craftswomen advise to choose draped materials for tailoring. It is important to take into account that one-piece sleeves have certain design features, so they try to make such products as short as possible. The sleeves become a continuation of the dress, which gives an unusual and elegant look to everything.