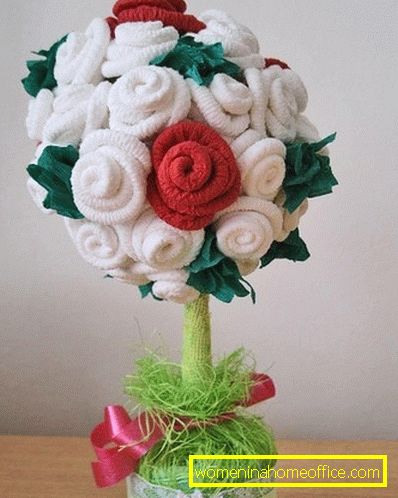
Napkin topiary
Topiary is an artificial ornamental trees, which are made of various materials: from plain paper and napkins to coffee beans and candy. Such decorations for home and office can be purchased in some stores, but it is also very easy to make them yourself. In addition, this is an exciting and interesting activity.
Such cute neat trees are able to revive the familiar interior and complement the design of the house or cottage. Topiary can be used as an original gift for a birthday or housewarming.
How to make a napkin topiary on your own?
Topiary - simple and inexpensive crafts, materials for which there will be in each house. But in order for the products to turn out to be truly unique and exclusive, it is worth taking a responsible approach to the selection of parts and accessories. If you are new to needlework, do not worry about such a simple job you get the first time. The main thing is to stock up on free time, patience and try to do everything as carefully as possible.
As the basis for the crown fit different materials, as long as they keep their shape. Most topiary have a rounded crown, so you can use any spherical bases. The most convenient way is to work with paper (a regular newsprint will do), cloth, foil, and foam. You can also use hollow balls, rubber and tennis balls.
For the trunk of the tree, you can adjust the branches from the trees, a thick dry vine, cardboard or plastic tubules, thick pencils and pens. It is important that they are smooth and even. The interweaving of several branches of the vine also looks beautiful, especially in combination with flowers on the crown of the tree. The barrel is painted and decorated with various materials, for example, foil, twine, colored paper.
The base is made from any fillers. It is important that he could hold the trunk with the crown. The most convenient fillers are foam, floral sponge and polyurethane foam. You can take more solid materials for the base, such as cement-sand mixture. But you should not weight the product at the expense of the filler, the lighter it will be, the better.
Topiary placed in pots or small containers. A plastic or ceramic flower pot or a special flower container is ideal. You can also use wooden boxes, rectangular or round shape, you can make them yourself.
From improvised means fit large jars of creams, glasses, old boxes and other containers unnecessary in the economy. Even if the pot looks inconspicuous - do not worry, it can be decorated outside with paper or covered with paint. Ideally, the pot should match the style of the topiary and the room for which it is made. It should also be in harmony with the size of the crown of the tree. You can decorate a pot by sticking colored stones, rhinestones, beads, shells, foam balls and ribbons on it.
It is important to have on hand a universal glue, a stapler, paint cans, brushes, plaster, cement or foam, scotch and scissors while working with a tree.
Different materials are suitable for decoration and crown manufacturing: paper napkins, various colored paper, coins, coffee beans, ready-made artificial flowers and leaves, buttons, beads, artificial ladybugs and butterflies. The more diverse and messy the set of source materials, the more beautiful, more colorful and original the product turns out.
Making a beautiful bouquet: master class

For the manufacture of topiariya you need:
- Pot, container or cup.
- Thick sprig of a tree, plastic or paper tube of at least 25-30 cm in length.
- Cement sand mixture.
- Newspaper or any other paper for the base of the crown.
- Simple sewing thread, which is not a pity (seen in the finished product will not be).
- Napkins for flowers of 2 different shades.
- Green napkins for leaves or leaves with artificial flowers.
- Universal glue. It is most convenient to use silicone for pistols or "Moment-crystal".
- Scissors.
- Knitting needle or pencil to form colors.
- Artificial grass, colored pebbles or glass to decorate the surface of the pot.
- Any decorative elements at your request.
Step-by-step instruction:
Manufacturing basics:
- To begin with, we will prepare a pot and fix a tree trunk in it. 2/3 of the volume of the pot fill with a dry mixture of sand and cement and add a small amount of water. Stir to make a thick gruel. Wipe the edges of the pot with a rag so that there will be no traces of cement; when it hardens, it will be difficult to clean.
- In the center of the pot, until the mixture is frozen, place the trunk of the tree. Immerse it to the full depth or at least half. While holding the barrel, level the cement and sprinkle it with colored glass or pebbles. Artificial weed can be placed on the uncured cement. The decor will close the gray cement and decorate the composition. The base will harden for several hours. At this time, you can do the decoration of the trunk, as well as the creation and design of the crown.
- The barrel can be painted with acrylic paints, trimmed with twine, tapes or paper. Also, glue on it small colored pebbles or twist more thin branches of the vine.
- To make a crown base, take a newspaper and doubt it along. Make a ball out of it and secure this shape with sewing threads. The base should be tight and keep the shape of the ball well. When performing it, make sure that the ball is even, small errors will hide the flowers from the napkins, but asymmetry can spoil the topiary and make it curved. The size of the base ball should be slightly larger than the diameter of the pot.
- Secure the paper base on the tree trunk, making a hole in it. Grease the top of the barrel with glue and stick the base on it. Wait for the glue to dry.
Flower making:
- Paper napkins cut into several squares on the folds.
- Put 1 square on the table and a needle or pencil on its edge. Wrap the knitting needle in a napkin, hold it with your fingers and wind it on the knitting needle, rolling it over the napkin. The most important thing in this business is to wrap the edge, and then everything goes easily and quickly. Do not try to remove the irregularities that form when winding, they will not be visible in the finished flower. Leave a free 3-4 cm long unwrapped edge.
- When winding finish, slide the tube from the napkin to the center and pull it off the needles.
- Hold the workpiece by 1 edge and twist it into a roller. At the same time, end the tail inward. So you get the middle of the flower.
- Next you need to add a petal. Make sure that its beginning is located in the middle of the 1st petal, that is, the core, and the tips are hidden at the same time.
- In the same way, you can add a few more petals. From their number will depend on the size of flowers. To make them beautiful you need to have at least 2 petals.
- Twist and tie the free edge of the flower, make a strong knot to fix the bud and not allow it to disintegrate.
- Excess tail can be cut with scissors. Follow the rest of the flowers in the same way. 25-30 pieces are required for a medium topiary.
- Making leaves of napkins and assembly products.
- The leaves are made very simply and quickly. Green napkins are also cut into squares. Fold the 2 squares diagonally and make kulek of them, and then tie the bottom thread.
- Glue the flowers first with an instant glue or glue gun. It is safer and more accurate to make it with silicone glue.
- Place the leaves between the flowers and fix them in the same way.
- Topiary can be decorated with butterflies or ladybugs, apply for decoration glitter and ribbons.

See also:
- Coffee Topiary
- Do-it-yourself topiary: ideas
- Flowers from ribbons do it yourself
- Crafts from coffee beans do it yourself: master classes
- Roses do it yourself from napkins
Making topiary from napkins with your own hands will take no more than 3 hours, if you do not take into account the time required for the cement to harden. Before you begin, think over the design of crafts, so that nothing is redone in the process. You should not put topiary napkins on the windows, there is a lot of sunlight. Colored napkins can fade or completely burn out.