Knitting sledkov two needles without seams
If you want to try to knit the first hosiery in your life, start with sledki. This is a kind of compromise between slippers and socks with a very short, practically absent leg, which can not only be worn at home, but also put on outdoor shoes.
Of course, such things are best performed on circular needles, but professionals recommend to beginner skilled workers to try their strength with two ordinary needles so as not to be confused in their number and between parts of the product.
Knitting sledkov on two needles: a master class for beginners
There are 2 main ways to tie such slippers without a seam without using stockings. The choice depends only on how difficult it is for you to work with the spokes, as well as what type of product you want to receive. True, to say that slippers will be completely without seams, it is impossible: the joints are still present, but here they are better hidden and smaller than when assembling a large number of parts. The simplest work algorithm will require 3–4 hours of free time, but it can take up to 6 hours for beginning masters. The technique of shortened rows is used here, as a result of which the shape of an un-assembled sledka is a soft semicircle.

- It is recommended to knit on needles No. 4 or No. 3, take woolen threads, medium cruelty, or half-woolen. Since no complicated patterns are supposed to be here, the basis is a scarf knit, it is recommended to play with the color gamut and use 2 different shades. The figures below are relevant for the foot length of 24 cm (the traditional 37 rr).
- Type on the spokes 18 loops with the thread of the main color, knit a full row with the front ones, holding the thread at work. Now, in order to designate a simple pattern in the form of vertical stripes, enter a thread of a contrasting or different from the basic saturation shade, knitting with it 13 face loops. Expand the work at this point and again knit 13 face loops with the same shade again.
- Start a new row with a nakid, followed by a row of 16 facial lines that are the same length, but with a basic tone, and a return for 16 loops, also with the thread behind the work, after the needle is turned upside down.
- The next pair of rows (i.e., odd and even) needs to be completed in just 7 loops, which are performed with additional (for the pattern) color. After each row, before turning the working thread is transferred forward, then a new loop is removed (in this case, 8 in a row), the work is inverted. Then the thread is again transferred forward, the loop is transferred back to the auxiliary needle, the thread is returned back and the same loops are knitted to the hem. Thus, a shortened row is formed.
- Do not forget that the edge loops are made from nakida, continue the specified alternation: a full pair of rows (odd and even) for the entire length of 16 loops (except for the edge), then a pair of rows of 13 loops of a different shade. Then again, a full-fledged pair of 16 loops and shortened by 7. However, the alternation may look different: for example, 16-13-7-13-16, etc.
- As the working canvas increases, you will see that the detail looks like a soft semicircle, the outer arc of which should be equal to the foot length multiplied by 2. Occasionally apply it to the foot in order to track the progress of the work and not make a mistake with the moment of its completion. As such, the scheme or a clear number of rows is not here: it all depends not only on the size of the leg, but also on the selected yarn, its density and its ability to stretch.
When knitting is completed, close the loop, fasten the thread and, leaving a long tail (1.5 times longer than the sum of a large arc and the short side of the semicircle), cut. With the same thread, threaded into a thick needle, sew the short sides of the slipper, folding the part in half, and along the outer arc. Sledok ready, will only make him a pair.
- In this technique, there is an important nuance: in its pure form, it makes slippers "asexual" - that is, there is no difference where the toe and where the heel, since these points are equidistant from the center of the inner circle. In order to slightly displace them and thus mark the elongated front area, start knitting a simple rectangle (the edge will be the center of the heel stitch), reach the outer stone on the foot and work out the entire toe with short rows, then knit the rectangle again to the very end. After you bend the part and sew it, you will get slippers with a clear cape and a soft heel.

If you have easily mastered this technique, you can add variety to it, and work out the same pattern of shortening the rows with a less simple pattern: instead of vertical stripes, separate the toe from the main part with a slipper by color or relief.
Sledkov on two needles without a seam on the sole
In the previous version, of course, very simple and convenient for beginning craftswomen, there is a significant minus - the central seam on the sole, which, even taking into account the fact that it is deprived of relief, can still be felt when walking. Therefore, we propose to study the idea of knitting such slippers with a solid sole, which is connected to the main part. Thus, the seam also exists, but it delivers less discomfort.
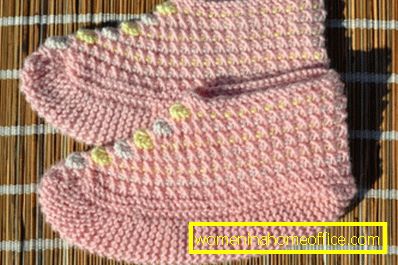
- In fact, such slippers can also be knitted in different ways. You can use the scheme discussed above by filling out the upper part of the slipper with it, then separately tie the garter stitch and sew both parts. It is quite simple and fast, besides, you can make a very dense sole if you make 2 identical parts, or take a tighter yarn for it, or crochet it.
- You can go the alternative way, where you do not need to remove the finished work from the spokes in order to proceed to the next stage: in this case, you will need to carefully read the instructions so as not to get confused in all changes of direction. Needles number 3 or 3.5, as well as 100 g of wool blend yarn are required. If you wish, you can take 70 g of yarn of the main color and 30 g - additional, for the pattern.
- Dial 49 loops, make 5 rows with face loops for both even and odd loops, which will be an ankle-length edging. The height can be made a little more, at your discretion, but it is desirable that an odd number of rows be maintained.
- If you want to make a discreet pattern, at this stage enter an additional thread. Tie an edge loop, remove the next as a front one, tie the next one with a front one, then again remove it as a front one and then re-crochet. Alternate removed and knit for 24 loops.

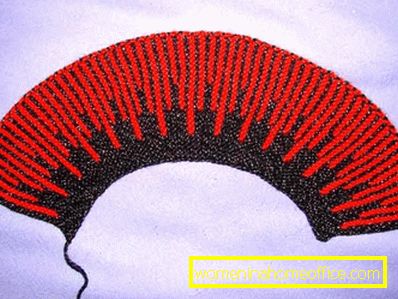
- 25 loop will be the point of expansion of the canvas: from it you need to knit exactly 9 loops, designating them as the front, nakid, front, nakid, etc. The following 24 loops should be worked out in the same way as the previous ones - removed as the front one, knit as the front one. Remember that at the time of removal of the thread should be behind. Due to this move, with a central loop, you form "fans" with a round base-hole.
- If you made a pattern with color, in the new (reverse) series you will need to remove all those loops that were made with the main color, and the new ones (those that you knit) will again knit with facial ones, including an additional 9 in the center. The next pair of rows (odd and even) needs to be knitted with simple face loops, the hem is traditionally doubled. Then repeat the steps from 1 to 4 rows, also from the central (now 29th) loop, tying the new 9.
- The number of rows you need to perform depends on the height of the foot, but it must always be a multiple of 4 in order not to disturb the pattern. Usually it turns out about 20-24 rows, but experts advise occasionally to put the canvas to the foot, and not to trust the general figures. After the height is reached, you need to close all the loops (and by this time there will be at least 100), or transfer them to the spokes with a silicone fishing line.

- Now it is necessary to tackle the sole, which begins with an odd number of loops: 1 is always central, as on the top part, after which at least 5 loops are set aside from it. For the standard 37 size, 7-8 loops will suffice left and right. It is best to start knitting them from the unclosed loops of the upper finished part, working as the main color in the garter knitting technique - face loops on all rows. Each new row begins with the edge loop of the upper part, and ends with it, but from the opposite side. Thus, you bend this part and connect it, at the same time pulling out the sole.
By the heel it is recommended to start loops to decrease, tying 2 side ones in 1, holding the thread at the back. You can make a sharper transition by connecting 3 loops at once, right and left. The remaining central loop will need to close and then sew the back seam of the upper part, for which you can use both a needle and a hook. Soft socks without a seam on the sole are ready.
- Since the mating algorithms, which were discussed above, are very simple, and the products, respectively, come out uncomplicated, after mastering the proposed techniques, it is recommended to try the same tracks on two knitting needles with a pattern or three-dimensional decorative details. The latter are best done with a crochet, since it is extremely difficult to achieve the same shape and rigidity with needles.
- You can choose absolutely any pattern for knitting - from large braids to openwork air weaving. The main thing is to understand how to adjust it for a specific scheme of work - in particular, for circular discrepancies in the area of the toe.
If you are not confident in your abilities, use the ready-made decor: for example, take a narrow satin ribbon, pass along the edge of the upper border (ankle), tie a bow over the toe. Or you can peep the idea from the Oriental dancers, who most often wear such slippers, and trim the tracks with beads that are strung on a thread. Slippers with fluffy pom-pom from yarn pieces gathered into a ball will look no less interesting.