Bow of satin ribbon do it yourself
Hand-made things always look stylish and unique. Recently, many fashionable women have used satin ribbon bows as a supplement to various accessories. Of course, such a bow can be purchased already ready, but it is much more interesting to make it yourself. We offer you a few techniques for making ornaments made of satin ribbons.
What is kanzashi technique?

The technique of making ornaments of satin ribbons came to us from Japan and is called kanzashi. In the CIS countries, it has undergone some changes. Our needlewomen use domestic materials in their works. These are mainly ribbons of different types of fabrics, beads, pearls and other various components.
It should be noted that the bow of satin kanzashi ribbons in the Handmade technique is especially popular today.

Manufacturing Technique:
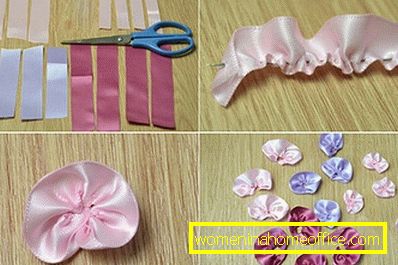
- It is necessary to cut four strips of burgundy ribbon of 14 cm length.
- Now cut out four stripes from a blue ribbon of 12 cm length.
- Next, you need to cut three strips of 25 mm pink tape length of 10 cm.
- Cut four strips of 16 mm pink ribbon 8 cm long.

- Using a needle and thread, we put the edge of the ribbon on the thread and tighten it tightly in a circle to make a petal with folds (as shown in the figure). This action must be repeated with all pieces of tape.

- Then take the burgundy and pink petal 25 mm wide, fold them together and glue it together.
- Now in the same way we connect among themselves the claret, pink and blue petal. Next, fasten the first obtained twig with the second with glue.
- We repeat the same actions with the remaining petals, adding to them a small pink flower in the middle. And all fasten together with glue.

- After all the petals are gathered and glued together, we glue each acrylic flower into each center.
- Next, in the center of each acrylic flower we glue beads with imitation pearls.
- Cut to size a circle from felt and attach it to the back of the barrette.
- Then, using hot glue, we attach our flowers to a circle of felt.
- The original barrette is ready.
Making a stylish hairpin with your own hands
Necessary materials:
- glue;
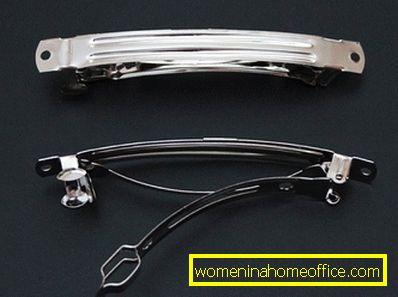
- base hairpins;
- needle and thread;
- scissors;
- satin ribbon.
Manufacturing Technique:
- Cut 2 pieces of satin ribbon. We use tape 2.5 cm wide. The first segment should be 20 centimeters in length, the second - 3.5-4 cm. You can also use your own dimensions.
- Apply glue to the edge of the main tape. Hold the edges together with your fingers and let the glue dry.
- When the glue is completely dry, fold the circle in half and gently align the edges.
- Collect the tape in the middle so as to make small waves. Fix the result with a needle and thread.
- Take a small piece of tape and fold as shown in the picture.

- Now wrap it around the middle of the main ribbon and sew it with threads. Process the remaining edges gently over the fire to prevent the ribbon from opening.
- Take a bar clip, place a drop of hot glue in the middle of the back of the barrette and fix the bow. Wait until the glue dries well. Ribbon edges can be sewn to the special holes on the back of the barrette with the help of a thread.

- The hairpin is ready.


Try to make also your jewelry. If you are a beginner, then a good option would be to first draw the conceived piece, to accurately represent the details and the manufacturing process. Add to your work a little bit of creativity and fantasy, and everything will work out for you!