Paper nails or nails
In any suit, the most attention should be paid to the details, especially if the image is planned to be unusual. For example, for Halloween and similar theme parties it is necessary to prepare a frightening and memorable outfit, and what evil does not have fangs and claws?
With the latter, everything is very simple: they can be made from paper or thermoplastic in a matter of minutes using the origami technique.
How to make paper claws?
If you are interested in claws putting on your fingers, there are 2 basic ways to create them: origami and easier twisting. Origami is suitable for those who want to make paper from claws of lynx or other predatory animals, who can hide a formidable weapon in their paw pads; A twist offers a more spectacular and dangerous outcome. What to choose - you decide, depending on the task.

- To begin with, we suggest trying classic nails or very long nails made of paper, for which you need exactly 10 white blank A4 sheets. The process is very simple, so be sure to connect the child to it.
- Position the sheet so that it lies vertically relative to you, bend over the lower corner so that it passes from 90 degrees to 45. Then bend again, but now the angle should touch the upper straight: the sheet will decrease exactly half.

- Now the remaining free (not bent) piece on the right is laid so as to obtain a full-fledged rectangle, and through diagonal addition turn it into a thick triangle. The bulk of the work is complete.
- Lay the triangle so that its top looks at you, and mark the vertical height: to do this, first fold it in half, and then unbend it back. If necessary, duplicate the fold line with the back of the scissors blade.
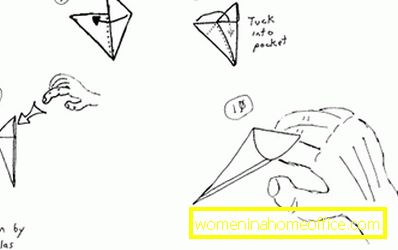
- Fold the left and right edges to the resulting vertical, forming a shape with a smaller degree angle at the top and already at 4 corners. The small protruding upper edge needs to be led to the opposite, after which a niche will appear in the product: it is designed so that the finished claw can be easily put on the finger.
After all 10 claws have been decorated (or less, depending on which image you want to create), they can be painted to match the original idea. And if you need an “accessory” longer, try a simpler pattern of paper claws.
- For work, you need not only sheets of paper, and it is better to take a dense material, but also a glue or glue gun, as well as a pencil and ruler. If necessary, take more paint - it is recommended to use acrylic in a spray can, especially if it is applied to thin paper.

- Put the sheet in front of you, use the ruler to mark the middle of the upper short side and draw diagonals from the bottom corners towards it, creating a triangle. If desired, it can be made narrower, for which the points of the lower corners are shifted inward. Cut this shape with a knife or scissors.
- Now turn the template into a cone so that its edges are facing each other, and glue them. Make sure that the circumference of its base is clearly the size of your finger, otherwise the claw will constantly move down.

- When the glue dries, securely fixing the edges, make a marking on the cylinder: these should be 2 diagonal lines dividing the figure into 3 almost equal parts - future phalanxes. Cut it along the markup, and then glue it so that they fit on each other at an angle, creating a natural bend.
Finished claws can be processed with any paint available to you, after which they need to be dried. Or, to imitate steel, they can be covered with shiny foil. Moreover, such a move allows you to hide and place the folds and fastening, making the product more solid and neat.