How to crochet a scarf for beginners
You have recently learned the basics of working with a crochet and are already thinking what is there to connect? There are many options, but it is best to start with the manufacture of simple products. Our master class will tell you how to crochet a scarf for beginners to adults and children.
How to crochet a scarf for beginners: a step-by-step master class
If you hold the hook in your hands for the first time in your life, it is likely that even simple knitting without the basics will be difficult to master. Therefore, we propose to tie such a scarf, for which no scheme is required. But don't let that bother you, because such a wardrobe detail will turn out to be very original and fashionable, and most importantly, warm.

Necessary materials:
- yarn of different colors;
- hook 3.5-4.5;
- thick cardboard;
- scissors.

Step-by-step process description:
- Knitting a simple scarf, as well as other products, begins with a set of air loops. To do this, take a hook and a piece of thread of any color about 5-7 cm.

- Now we make a sliding knot, insert a hook into it and wrap loose yarn around the tool. We skip the hook along the slip knot.
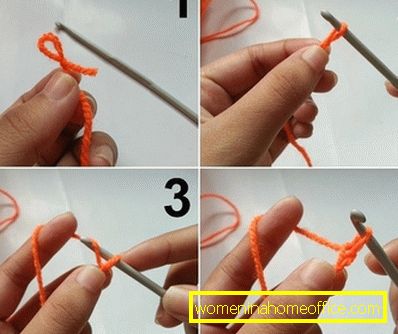
- After you have made the first steppe stitch, you need to repeat the same action the necessary number of times. How many air loops to dial depends on how long the scarf you want to end up with.

- Now it will be necessary to cut a piece of cardboard measuring 3x10 cm.
- When you are done making the air chain, use the hook to stretch the last thread through the last loop 2.5 cm in length and fasten it to the cardboard.
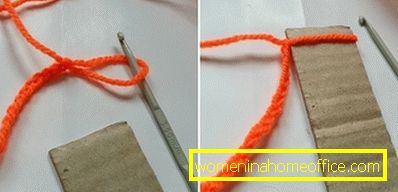
- Insert the hook into the next lifting loop, pull the working thread to the desired length and fasten the resulting loop on the cardboard.

- After you reach the end, carefully remove the cardboard.

- Similarly, make a thread of another contrasting color.

- Now that both laces are ready, you can begin to weave. We set up a hook at the bottom of the top four loops of blue color, grab the same number of loops of orange color and pass them through each other.

- Then insert the hook into the next 4 loops of blue color and pull them through the orange ones.

- Keep doing the same until you reach the end of both shoelaces.

- After you have fastened both parts together, it's time to increase the width of the scarf. To do this, we again need a piece of cardboard and a contrasting pink thread.
- Take a new thread and use the hook to make a loop on the cardboard.

- Make the required number of loops along the length.

- Just as in the first step, make an additional strip with loops of red thread. Then attach the new thread to the scarf.

- In the same way, increase the width of the scarf to the size you need.

- Now you just add the finish. To do this, you need to cut off 5-6 pieces of yarn of the desired length.

- Then fold the yarn in half and crochet it into the final loop of the scarf.
- Thread the yarn tip into the ring and tighten it tightly.

- Do the same with the rest of the tassels on both sides of the scarf.

- The finished product must be washed and the crocheted scarf is ready for beginning needlewomen.
Children's scarf: description scheme
Even a novice skilled worker will be able to knit a great children's scarf, if you choose the simplest scheme for work. To do this, it is enough to understand how to knit air loops, double crochets, and choose the necessary yarn. For example, if you take acrylic threads, you get a great scarf for a warm winter, and yarn made of thin cotton will create an openwork autumn version.

Necessary materials:
- colored yarn;
- hook 3.5.
Step-by-step process description:
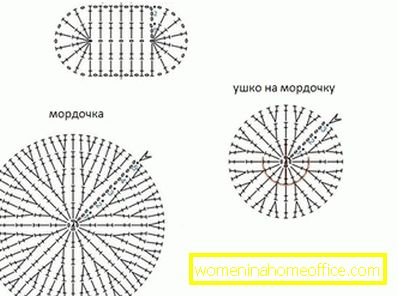
- Work on a simple children's scarf begins with knitting of a general cloth. To do this, use the following scheme.

- We crochet a chain of air loops, counting their number from the desired width of the finished scarf.
- Then we count from the edge of the chain 4 loops and enter the hook into the 5th hole, knitting a single crochet post. Further knitting continues according to the scheme.
- When the desired length is reached, the loops are neatly closed, and the thread is cut and hidden.
- Now you need to start decorating. Under the new scheme we knit 4 paws, a muzzle and 2 ears. But do not forget that circular crochet always starts from the center.
- At the end we sew with a needle with a double thread in the color of the product the finished parts for the scarf.

- From velvet fabric we cut and glue eyes, and embroider the nose and mouth.
- Wonderful autumn scarf for the child is ready.
You do not need to be an expert in the field of crochet to create original, useful and beautiful wardrobe items. Of course, not everything can happen the first time. Try to tie a simple scarf in our master class, and then you can easily master more complex techniques. Finally, I would like to wish you good luck and creative success in your work!