Do it yourself
A cozy soft blanket is always useful at home, and if you make this blanket with your own hands, then the value will be even greater. You can attract the whole family to needlework, and then in the winter evenings you will warm up together under a warm blanket made with your own hands.
Bright fleece blanket do it yourself
A soft fleece blanket without a single line and eyelet will be obtained even for a child. Fleece can be called fashionable recently material. Durable, lightweight, warm, easy to wash. In addition, this fabric is easy to handle and sew. Fleece is ideal for creating a rug. For this job, you do not need special skills in knitting and sewing.

Image taken from www.kollekcija.com
- You will need an even number of fleece squares, it is best to make them 20 by 20 cm in size, but their number depends on the total size of the plaid that you want to receive in the end. All sides of the squares cut the noodles into the same number of segments. The length of each segment is about 4 cm, with an interval of 1 cm. You will have 10-12 segments on each side.
- Now put the received preparations in the necessary order on a plain surface, the floor will be best suited. Thus, you can lay out any pattern: cells, stripes, rectangles, triangles - everything your heart desires.
- Tie together the so-called noodles knots. The stronger - the better for ages. The work is painstaking, monotonous and requires patience. Attach someone to the joint work, it will be much more fun, and the time will pass unnoticed. At the end you can decorate the blanket with bright applications.
Plaid fleece do-it-yourself "Chessboard"
Here, by sight, as in the past master class, you can’t do to make the blanket beautiful, neat and even, you need to adhere to certain standards. Let's get to work seriously, not knotting we will tie the "noodles", and use the sewing machine, nylon thread, a special needle with a large ear and a fixed end. You will also need black fleece - 315 cm and white - 135 cm, pins, black and white yarn (take cotton cotton is better) and a measuring tape.

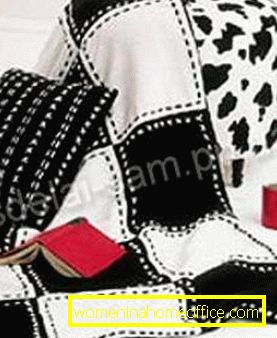
Image taken from the site: www.sdelai-sam.pp.ua
- To get started, take a black fleece, cut a piece of material the size of 92.5 by 115 cm for the back of the rug and 10 squares of 25 by 25 cm, the same 10 - and from white fleece.
- Then make 5 strips of 4 squares, alternating black and white rectangles in a checkerboard pattern. And so sew, leaving seam allowances of 1.5 cm.
- Undo the seams. And the strips are folded in such a way as to make a chessboard. Align the seams and line each fleece strip together.
- On white squares, embroider the black yarn with crosses, retreating from the edge of 1.5 cm. And, conversely, embroider with black threads on black pieces of material.
- Then fold the front part (this is what you did) and the back part (large black fleece canvas) and, having stepped from the edge of 1.5 cm, stitch the edges. But leave on the one hand not stitched 20 cm to turn out the blanket.
- It remains now to turn out the rug and iron. An open cut is carefully sewn with a secret seam. For this, you will need kapron threads for quilting. Do it from the front, laying a line seam in the seam.
- You cannot find such a fleece blanket for sure. White and black colors can be replaced by any other, as long as they are combined.
Do-it-yourself pompom blanket
Soft, fluffy, colorful, bright plaid of pompons is perfect for your baby. You can't buy it in the store, but you need to spend a lot of time and effort to make such a rug. So have patience.

- You will need a wooden frame with nails. You can make it of any size, but it is more convenient to 80 by 80 cm, nails are driven around the perimeter of the frame at a distance of 4 cm. Stock up on yarn for knitting (and the thicker the yarn, the more fluffy the product will turn out). It is best to take acrylic, which is used for children's knitting. Need about 800-900 g.
- Fix the thread on the extreme nail and begin to stretch it over the entire area of the frame along and across. There is 50 by 50 rows, and the first 25 by 25 is the base. For her, better suited white thread. And the next rows, which are again stretched in a ratio of 25 to 25, are better to take colored threads. They are then cut, but the base is not.

- Tie the intersection tightly. You need to cut in the middle between intersections, when you cut 4 sides from one intersection - get 1 pom-pom. So continue until all the threads turn into pom-poms. Be careful - from tightly stretched threads remain wounds on the parade grounds, you can even cut yourself.

Images taken from the site: www.lliveinternet.ru
The original, colorful fluffy plaid will delight your child. It will be warm and cozy in it. You can also use this blanket as a cover, such an unusual design will attract the attention of your guests.
Do it yourself from old things
The house is full of old things: T-shirts, sweaters, dresses? You do not know where to put them, but it is a pity to throw them out? Give them a second life! There is an idea - a warm new blanket of old clothes. Agree, it will be nice to hide your favorite things in the design performance.
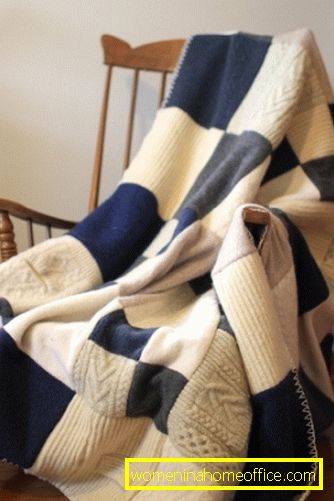

- First, find as many old sweaters as possible, better than woolen ones. Probably, every housewife in the house there are things that have not been worn for a long time, but still look quite decent, and, of course, suitable as material for your future rug.
- On average, you need about 10 sweaters, you can and more - it depends on what size you want to make a blanket. You can not get the right amount of woolen things, ask your friends, most likely they will gladly get rid of old unwanted clothes. Decide in advance with the color scheme.

- Now prepare the material, to do this, dissolve the seams on the old sweaters, unplug the lightning and buttons. After you have to roll things in order to woolen threads were strong and durable and do not spread.

- To do this, wash the sweaters, but pre-fold them in a bag for a gentle wash or in a pillowcase, tamp the drum with some other things and choose a long spin-off mode and switch the water from hot to cold.

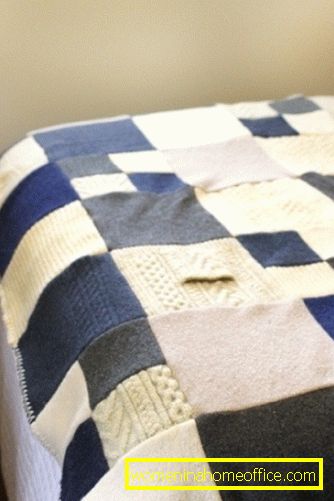
- Your plaid will consist of a set of squares, so make 1 template from cardboard and then cut out details on it. Then place your blanks on the floor, here the real design work begins, show imagination.

- Sew the parts on a typewriter using either a knitted stitch or the widest stitch of a straight stitch. The allowance is about 1/4 inch. Stitching the pieces together, be careful, gently advance the fabric, if necessary, drag through the sewing machine.

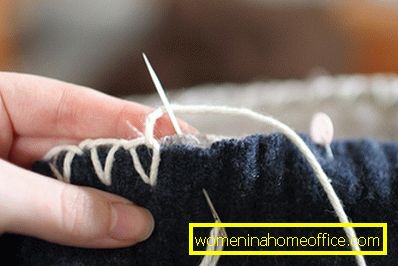
- Wool fabric can also be used as a lining, but both fleece and flannel are suitable. Do not forget to round off the edges of the front side and the lining before sewing. Finishing is better done by hand, using a closed piping seam. Your creation is ready.

Images taken from www.creative-handmade.org
Let it be warm and not boring in cold evenings under a warm blanket that keeps your hands warm.