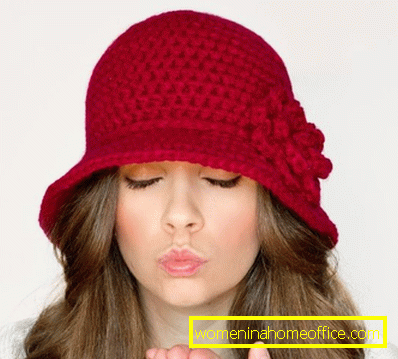
Crochet hat
The hat is one of the universal accessories. This headpiece can be sewn of fabric or knitted from yarn. The last option is especially suitable for hot summer days or a holiday time. Summer crochet hats can master any needlewoman, they are so easy to make.
How to crochet a hat?
All crocheted hats are knitted according to the same principle. First you need to take your measurements and think about the future model. Secure the measuring tape around the head. It should pass through the back of the head and the middle of the forehead. The number obtained should be remembered. This will be the size of the finished headgear.

Knitted hats can be completely different - with large, small fields, openwork or a continuous pattern. Also pay attention to the type of yarn. Often, summer hats crochet knit from cotton and linen yarn. They have a great shape. In addition, they are easy to starch. This treatment allows you to make the edges more rigid. It is best to use medium thread.
The knitting technique is made by knitting the crown first. To do this, close the air loop in the ring, and then begin to make gains. After a uniform knitting is obtained, which has wrapping edges. After that go to the fields. Make increases and knit the same number of loops to the desired width.
Simple knitting scheme

You will need:
- Measuring tape
- Medium thread
- Hook number 3 (or any other. That fits to the yarn)
Production instructions:
- Tie 3 air loops and loop around with a semi-column. Bundle 2 columns of a no-talk cover each.
- Start the 2nd row with a lift air loop. Then, in each column of the previous row, knit loops according to Figure 2. Finish the knitting, connect the beginning and the end with a semi-column. It is valid to repeat at the end of each row.
- In the 3rd row, begin the repetition: 1 st column of the brute-in v1-uyupetlyu, 2 - in the 2nd. We begin the series with an air loop, and end with a connecting stub.
- 4th row: 1st 2 loops - on the 1st column, and in the 3rd we knit 2 columns of the beznakida.
- By making additions in this way, tie 10 more rows together. We got the bottom of the future hat. At its base lies about 68-70 loops.
- Filing a crown. To do this, we perform 1 column in each loop. Thus, we need to knit a canvas up to a height of 12 cm. We knit 2 columns in the last loop of the row.
- Start making additions. In the 1st loop, knit 2 columns, skip the next one. Knit a cloth in a manner up to 18 cm (total height from the beginning).
- Next row: 1 loop in the 1st column, 2 - in the next. Repeat the sequence until the end of the row.
- Continue knitting a hat, tying 1 column of a besnakida. Bind the same way until the hat's margins are not attained widths. Cut the thread and stretch the tail through the loop. Then gently hide it.
Knit a hat girls

You will need:
- Thin yarn like "Iris" -100 gr.
- Hook number 2
Production instructions:
- Tie 12 air loops and lock them into a ring.
- 1 row: 1 column snakidy, 1 air loop, 2 column 2 curtains in 1 loop, 1 air loop. Repeat this way to the end of the row.
- 2nd row: 1 stolbix nakidy, 1 air loop, 1 stolbix nakidy, 1 air loop, 2 columns with a fold in 1 loop, 1 air loop.
- 3 row: 1 stolbix nakidy, 1 air loop, 1 stolbix nakidy, 1 air loop, 1 stolbix nakidom in 1 loop, 1 air loop. Knit in this way the following 3 rows.
- 7th row: knit 1 column in each loop with a snake and between them 1 air loop.
- Go to the fields. And we knit each loop of the previous row by means of a 2 column snakeed. Between them - 1 air loop.
- The following rows are columns of stitches in each loop. Knit the shape until the field reaches the desired width. Cut the thread and stretch it with a hook in the last loop. The tail is neatly straightened inside out.
- Decorate the finished hat with motive or crocheted flowers.
Summer stylish hat
This model of hat is sufficient in its implementation. At the same time it looks quite stylish. You can wear it with a summer dress, denim shorts or linen trousers. The headgear is versatile and suitable for any style of clothing.

You will need:
- Cotton or linen yarn, 320 m. In 100 g. -1 hank.
- Hook number 2
- Field line
Production instructions:
- To begin with, we calculate the diameter of the bottom of the future hat. To do this, we measure the head circumference. The resulting number is divided by 3. Then subtract 2 cm from it. This is done because the product will sit down a bit after washing, but then it will stretch out over the socks.
- We begin to vyvyazyvat bottom. For this we close 3 air loops in a ring. Then we knit 6 loops into it.
- With 2 rows we start adding. To do this, we knit 2 loops of a besnakida into each loop.
- 3rd row: 2 posts in a loop, 1 loop, 1st-2nd. Alternate knitting way to end the series.
- We knit according to the scheme until the crochet bottom diameter of the hat becomes equal to the number, which we obtained due to the calculation at the very beginning.
- We proceed to perform the crown of our headdress. To do this, we knit a 1 column of a besnakid in each loop. The first row is performed sufficiently. Thus, we continue to knit periodically trying on a blank. To finish the crown need when it reaches the height to the ear. At this point, you need to create holes for threading decorative tape. For this purpose, the last row of the crown is made up of 1 column stitches.
- Next, go to the fields.
- 1 row: in each 10 loops of the previous row, we knit 2 posts of a besnakid. The following 3 rows are performed without additions, according to the picture.
- 5 row: we make an addition in the form of 2 posts without having to wrap every 12th loop. The following 3 rows will be knitted without increments.
- 9 row: addition of 2 columns in each 14 loop. The following 3 rows of unchanged.
- Row 13: adding 2 columns to each of 16 petitiono ends of the row. Next, we need 3 columns without increments. We have formed with a little broken hat fields. We proceed to strengthen them.
- We cut off a long piece of fishing line. Pressing to the last row and neatly tied with a column besnakida. When we come to the end of the row, the line should be cut and join its edges. To do this, they are melted with a lighter. We cut the thread and gently hide it inside the headdress. Crochet summer hat is ready!
- Almost all hats in finished form do not hold the form. They can be done brutally in the same way. Usually use starch, sugar syrup. No less effective and gelatinous solution. Take inagreyte1 Art. water. In a hot liquid, pour in a bag of gelatin weighing 25 grams. Mix everything thoroughly. Then add anti-0.5 h. l salt and 4st. l 9% vinegar. The liquid should be poured into a large bowl. Then they put a knitted hat there and let it get wet. Next, the product is wrung out, the water is allowed to drain.
- The table is covered with plastic bag or plastic. We put on her three-liter jar. We put a hat on her. Give it shape. Pay special attention to the product line. Lets dry out a little. Then we take off our hat and are standing up on polyethylene. We moisten the fields with the help of a sponge and smooth it smoothly. They should lie flat on the table. Give the product to dry. After that, the headpiece is ready to wear.
Variety of models


In order to tie a hat with a crochet, you need to remove the head girth. Knitting starts from the bottom. Usually, the air loops are looped into the ring, then they begin to be added. Tighten until the workpiece reaches the desired size. Then go to the crown. She knit without additions. For the fields, you must perform a certain number of double columns. They will help expand them. Then the fields are knitted without additions until they reach the desired width.