How beautiful to tie shoelaces on sneakers
In how many ways can you lace up sneakers, shoes? It depends only on your imagination, even though the direct diagrams are only 2 - horizontal and diagonal, but loops, plaits and other elements are added to them, different alternation is used, as a result of which similar, but completely unique design options are born.
This article will consider a few simple ideas for different types of shoes, among which you will definitely find something directly for you.
How beautiful tying shoelaces?
The number of schemes for interlacing is so great that there is absolutely no possibility to consider everything. Therefore, we will highlight only the most frequently asked questions, and their work is opened by a small number of holes. For example, there are 6 holes on sneakers, and tying shoelaces is beautiful and original quite difficult, because the pattern is almost unreadable. What is preferred?

- Any simple patterns repeated on each row will look advantageous: for example, pull the ends of the lace out of the holes in row 1 through the bottom, cross over the center and twist it 1 or 2 times, then move the right to the left and the left to the right through the bottom, but already close above.
- But for 6 pairs of holes it is already possible to make something more original: for example, to make the same X-shaped crosses through a row. First, the right tail stretches in a row above, then it is led to the left from the 2nd row to the 3rd row. The same thing is a mirror with the left tail. Then they rise again next to each other through a “secret stitch” and again draw the letter X outside.
- The elongated herringbone looks impressive, in which they make horizontal on the 5th row, and then the right tail is pulled in the 3rd row to the left and 1 row to the right, and the left one moves mirror. After that, they are raised next to the previously considered "secret stitch" and repeat the same steps, but upwards.
It is interesting to tie the shoelaces on the sneakers, if the shoe has a large number of holes: 10-12 or more - ideal. Moreover, the highlight can be not only the front lacing, but also the side.

- Swipe the string in a horizontal line into the holes of the 1st row from the bottom, then each of the ends into the hole next to it on your side (that is, right, left, left), but do not tighten - there should be a small loop.
- After that, move the right end to the left so that it enters the loop from the bottom, and repeat the same with the left end. Tighten the hinges and start forming new ones next to each other. Make sure that the ends of the laces cross each time in the same way - either left over right or right over left.
- In the last hole, the loops tighten immediately, the knot and / or bow is formed in the center. This way you will have an interesting weave on the side.
How beautiful to tie shoelaces on shoes? Since these are strict shoes that are used according to the framework of the dress code, everything connected with it should be as discreet and elegant as possible. Therefore, here choose and discreet shades of laces (preferably in tone with the shoes themselves), and the minimum thickness, and the simplest pattern. The most successful is considered horizontal lacing.

- Enter the ends through the top into the holes of the lower row, creating a flat line, then draw the right one through the bottom into the next upper (2nd) row, and the left into the odd one, i.e. in the 3rd row. Take them outside.
- Now stretch the right tail of the lace from the top to the left, inserting it through the top into the hole of the 2nd row, and repeat the same with the left tail over it. To go to the next level, lead the string through the row inside: this way, apart from parallel lines outside, nothing will be visible.

If the dress code allows (for example, you do not change the classics for a walk, but you want a highlight in the image), try less traditional options: leave some holes intact, alternating the length of the lines that are “drawn” by the laces. True, most of these ideas require shoes with 10 or more openings so that the pattern really looks complete.

Use of multi-colored laces and ribbons
This method is particularly popular with young people, in particular, among representatives of informal movements: shoes instantly turn into a bright, noticeable element of the image. The most spectacular multi-color lacing looked on large models, which was in high demand in the 2007/08 season, but, in fact, they can be tried on any shoe, with the exception of formal, shoes and shoes of strict style. Also, you can follow any scheme, even the simplest one - the main principle is alternation.

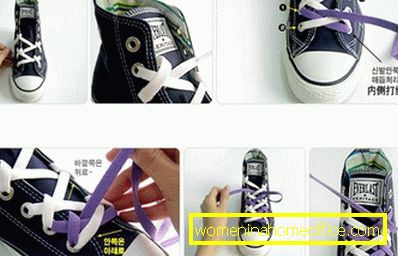
- Try to start with just 2 shades, as shown in the photo. Lay the white lace horizontally, in the 2nd row from the bottom through the top. After the broach, cross its ends and pass in 4 rows from the bottom, too, through the top. Using this algorithm, work with all the even rows until they run out, and leave the ends loose.
- Now take the blue lace, just horizontally lay between the holes of the bottom row and pass through them through the top. The next moment requires accuracy: cross the ends so that the place of their meeting is clearly above the horizontal line of the white lace, then put the diagonals underneath it and enter 3 rows through the holes into the holes. Cross again and move under the white lace, and re-enter the holes in the odd row.
If you have coped with the previous task without difficulty, you can try a more complex idea: here you will need to be attentive at the very beginning, although in general the work is much easier than it seems. It is recommended to use no more than 2 shades that contrast each other. The work will be constructed so that one end of the lace will be inactive and must be hidden inside: for this it is tied with a thick knot so that it does not accidentally slip out.
- Insert a white cord into the hole 1 of the row to the left and 2 rows to the right to form a diagonal line entering from above. Then take the right side, bring it at the level of 2 rows from the bottom and slide into the hole of 1 row from the same side, as shown in the figure: you should have a semi-cross. Pull the same part of the lace and push the 3 rows to the left through the top of the hole. Repeat the steps to create a half-cross and follow them to the very end, alternating sides.
- You should have some free areas between the left and right holes that do not coincide in level. They will be filled in the same way, but now the lacing will enter the occupied holes, so it is important to use thin laces. In addition, they need to alternate: first hold under the white diagonal (right to left), then above it (left to right). In this case, the pattern will turn out beautiful and harmonious. Accordingly, the bow after tying will be two-color.
Finally, we offer a variant of chess lacing, which was used for shoes a few years ago: it is built on contrasting shades and flat wide ribbons, it does not hold the product too well on the leg, but definitely attracts the attention of others.

- Enter the first color so that the worker has only 1 end, and with its help perform horizontal lacing: connect the holes of each row from the top, while inside pull the cord on the sides, which can be traced along the dotted line. Thus, internal transitions go from 1 left row to 2 left row, then outer horizontal and inner transition from 2 right row to 3 right row, etc.
- After this comes the stage of decorative lace of a contrasting color: they start to lay it on the bottom, distributing the length so that equal halves are obtained on the left and on the right. Enter each of them using the classic weaving method: first below the horizontal, then above it, and again below the horizontal and above it. Vertically, 4 rows should turn out, after which the ends again end up at the bottom and wind up inside, where they are fixed by the main cord.
Based on these ideas, you can create more than 10 different schemes, how to tie shoelaces on any shoes of this kind. Play with techniques and colors, try to use several different materials, if it fits into your style, and you are sure that you can even express yourself and achieve originality in such a seemingly insignificant matter.