Light nail art
Neat and beautifully made up nails in our time will not surprise anyone. But an exclusive manicure with paintings, rhinestones and intricate patterns attracts admiring glances. Today, to create it, it is not necessary to go to a beauty salon, although there, of course, a professional will do everything perfectly. Our article will reveal some simple secrets of how to make light drawings on the nails yourself.
Beautiful light drawings on the nails at home
If you are just learning to create masterpieces of nail art, then you should start with light patterns on the nails with a needle and gradually move on to a more advanced technique:
- Apply a base color to your nails and let it dry for a while. After that, using a needle or toothpick, apply dots of a contrasting color on the nail plate in a chaotic manner.

- For fans of French manicure, you can also find a large variety of options. To slightly embellish your nails, it will be enough just to change the color scheme.

- Making an easy pattern on the nails for beginners will be easy with the help of a regular cocktail tube. Apply a basic white base on your nails, dip the tube in a more contrasting color of lacquer and put a few prints on the nail plate.

Phased workshops
To make it easier and easier to master the technique of creating light patterns on the nails, especially for you, we selected step-by-step master classes with a detailed description and photos. Now it will become even easier to learn the art of nail art at home.
Paint with varnish
Manicure, made in the gradient technique, gained its popularity relatively recently. The whole essence of such nail art is in a smooth transition from one color to another. This is done very simply, and the end result looks amazing.
Necessary materials:
- nail polish 2 similar shades;
- fixer;
- sponge;
- toothpick;
- file for paper.
Step-by-step process description:
- First you need to paint your nails with a lighter shade of paint and wait for a while until it is completely dry.

- Next, on a plastic file for paper, generously pour the varnishes of both colors so that their edges touch.

- Now take a toothpick and mix together the edges of the contact varnishes. The area where they are mixed will determine the amount of color transition.

- After that, take a piece of sponge and blot the varnish several times.

- Apply the sponge directly to the dried nail and make several smooth movements up and down in the direction of growth of the nail plate.

- You can repeat actions with a sponge as many times as you see fit. However, each time, let the previous layer dry thoroughly, otherwise the transition will be blurry.
- In the future, cover the nail fixer in several layers to level the surface.
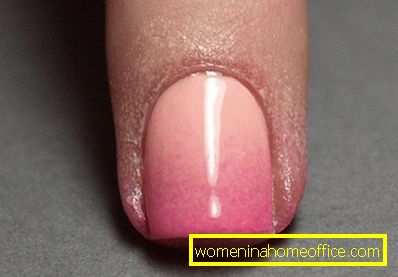
- Now remove the excess varnish from the periungual plate with a brush dipped in acetone.

Manicure for short nails
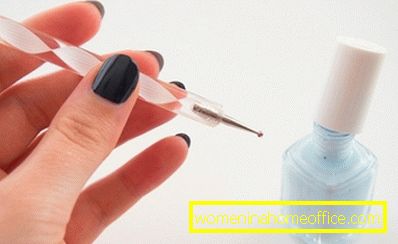
Short nails have long ceased to be a problem. Nowadays, you can make a beautiful manicure on almost any length of the nail plate. We offer you a moon manicure.
Necessary materials:
- white nail polish;
- black nail polish;
- thin brush;
- fixer.
Step-by-step process description:
- First of all, it is necessary to completely coat the nails with white varnish.
- Now dip the brush in black lacquer and draw a thin semicircular line. You should start from the upper left edge of the nail, and finish with a small indent from the bottom.

- Paint over the top of the nail plate with black lacquer and cover each nail with a fixer.

- Chic moon manicure for short nails ready.
Nail art paints
Beautiful nail art on the nails can be created using special acrylic paints. Of course, this process is more laborious and takes more time than previous master classes, but the result is worth it.
Necessary materials:
- fixer;
- white lacquer;
- black lacquer;
- pink and red acrylic;
- green acrylic paint;
- thin brush.
Step-by-step process description:
- To get a perfectly smooth and smooth pattern, you need to align the nail plate with a transparent varnish.
- After that it is necessary to cover the nails with white varnish. This will be the basic background of our picture.

- Give the nails to dry, and then using a thin brush draw vertical straight lines with black lacquer.
- After that we make 3 drops of pink acrylic paint in a chaotic manner, creating the base of the flower.

- Now, a thin brush is dipped into the paint of a rich red color and we brush around each petal, letting the varnish dry thoroughly.
- Then on the side of each petal we add thin leaflets with green acrylic paint.

- We cover nails with a fixer and beautiful floral motifs are ready.

Light drawings on black nails
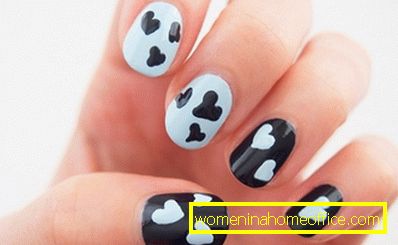
The basic black base on the nails is a classic of modern manicure. It would seem that black does not give romance, but if you bring in a little bit of creativity and draw floating hearts on your nails, your fingers will look original.
Necessary materials:
- dots;
- black lacquer;
- light blue varnish.
Step-by-step process description:
- To begin with, we make a basic base of black lacquer. For variety and creativity, several fingers can be coated with a light blue shade of varnish.

- We give nail polish to dry thoroughly, and in the meantime, we collect blue lacquer at the dots. If you do not have a special device, you can replace it with a regular toothpick.
- We draw in the corner of the nail 2 symmetrical points and connect them with a smooth line in the center.

- Fix the final result with clear varnish.
Make light patterns on the nails and give your hands a well-groomed appearance at home, using any available materials. Having mastered the basic techniques, over time you can move on to creating more complex nail art masterpieces. Add a little bit of fantasy to an ordinary manicure, and your pens will noticeably change.